
COVID Closure Extended

COVID CLOSURE EXTENDED – WE’RE GOING ON-LINE

The City of Richmond Hill, our hosts at the David Dunlap Observatory, are anticipating keeping all community centres closed until June 2021. The DDO is managed as a community centre, so that puts our activities there on hold until then.

Ylab members have been meeting on-line, including our Holiday gathering on December 21. By popular demand, we are planning some new on-line activities and training starting later this month. Stay tuned!

Main dome

Update on the DDO Restoration

Main dome
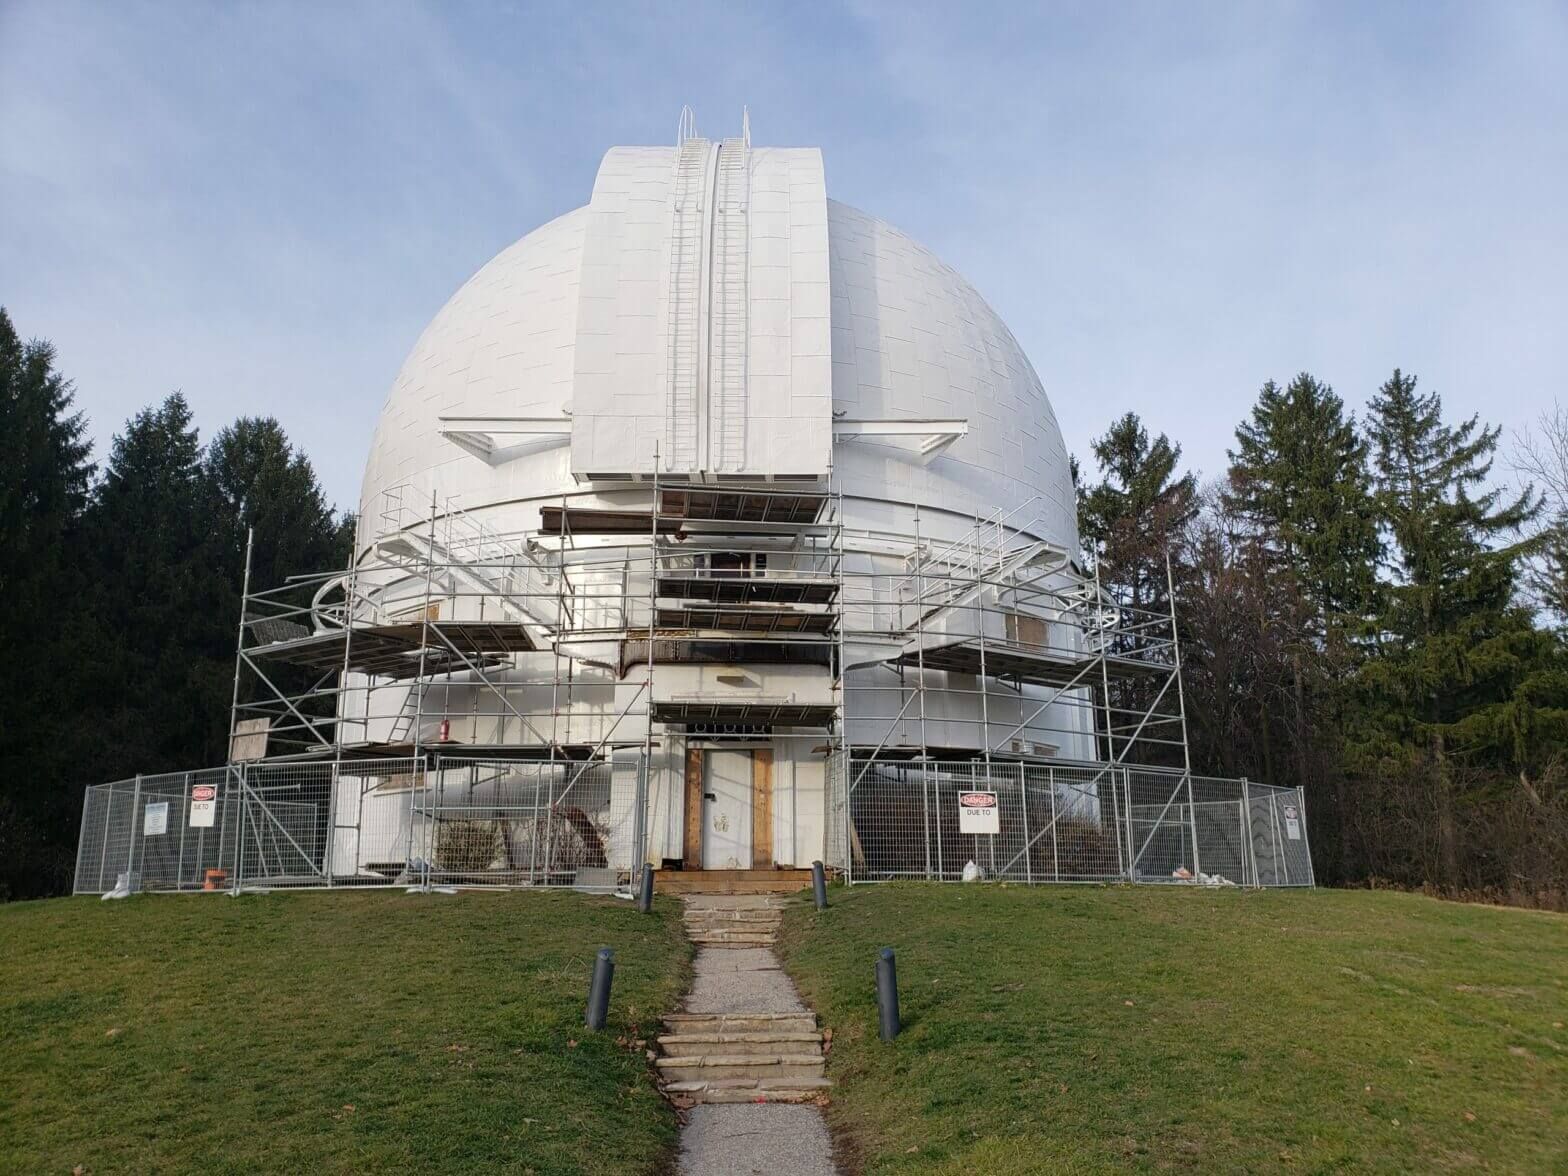
New paint job on the dome

Ylab’s home at the DDO has been undergoing an extensive restoration since the spring. As scaffolding is starting to come down,  it’s looking amazing.

The work has been extensive. Removing all the old lead paint without getting it in the environment. Carefully restoring all the windows to their original state – right down to the ropes on the counterweights for the original casements.


Three smaller domes on tops of the admin building

The administration building’s three smaller telescope domes got the same treatment. Parts of those were removed during the restoration and have now been replaced.


Windows and copper flashing around roof.
The more difficult semi-circular and round windows

Work is continuing. They’ve saved the most difficult semi-circular and round windows for last, and they are making great progress.

For one small group (us), the best news of all is that we may soon be allowed back in to our maker space rooms. We are working with the City on the protocols and requirements to keep everyone COVID-safe. 

Stay tuned!

Another fix-it night. Sorry, Crappy Tire.

We just happened to pick this one

Our recent fix-it night posts here and here seem to have a common thread: crappy Crappy Tire tools that need repairing. This week… well, we didn’t intend to pick on them. It was just the luck of the draw.


Small 12V tire compressors – the type that plugs into the cigarette lighter 12V accessory socket on your car – have cheap clips or screw-on ends to connect to the tire valve. Those ends are called air chucks. Probably because you need them to chuck air into the tire. The air chuck is always what seems to break on these stupid things. The rubber wears out on the clip types, the screw-on type doesn’t seem to match the threads on the valve, or they just plain fall apart. The rest of the compressor is fine. Go to Canadian Tire – and just to show we’re not picking just on them – Princess Auto or your other favourite hardware store, and none of them sell replacement parts. Hey, we try to buy local.

We have three with broken or very leaky air chucks. This is the one we grabbed for the repair. Anyone know what store sells the MotoMaster brand?

Fortunately, a certain large on-line shopping store has the part… once you figure out that it’s called after typing in things like valve… clip… air… tire.

We found a pack of two of these premium metal units for pretty cheap. We just happened to have an extra hose clamp lying around.

Next step is to get the old one off. You can try wresting with the crimped metal sleeve. That might be futile if glue was also applied. If you have enough hose, just cut it off.

The old worn-out clip type air chuck. The rubber inside is hard and cracked, no longer providing a seal.

Be sure to put the hose clamp on the hose before inserting the tube of the new chuck.

Tighten it up. This clamp might have been a little big… but it’s what we had.

Cut off the end with a tin snip or a chisel, and it’s better than new. In this case, way better than new with a far superior chuck.

Yeah, the two others we have are not MotoMaster brand. But we’re pretty sure we bought them at Crappy Tire.

Closing up the desktop project

Case closed. Desktop too.

We posted earlier about our project to make a lockable enclosure for the reception desk of our home, the David Dunlap Observatory. We left that post with a pretty crappy picture. Protective plastic was still covering it. 

Test usage showed an area for improvement. Sliding everything into place would work better with some handles.

Two at the front to guide into the locking tabs so we don’t hurt our dainty little fingers. Another one at the back to help slide it into the support brackets hidden under the top panel. All held in place with some strong rivets to prevent tampering.

A couple of coats rattle-can clear enamel and it’s ready to go. 

Here’s the overhead view from our amazing drone-cam.

Well, not really. We don’t have a drone. We just went up the stairs. But they’re really cool stairs. 


More tool repair

Nose to the grindstone

Last week we posted about our evening repairing crappy Crappy Tire tools. One tool  could not be fixed. Here once again is our picture of a pair of side-cutters that broke simply doing what side-cutters are supposed to do.

Reminds us of the old mechanic’s joke about there being two types of tools – Snap-On and snap-off.

Can’t fix… or so we thought.

Our metal master Miro wasn’t there that evening. He read the post and sent in a message: “We can fix that!”

How? Welding?

Nah.  It’s said that sculpting is easy – start with a piece of stone or clay, and take away everything that doesn’t look like your subject.

In this case, Miro ground it away.

And kept grinding.


Until it looked like this.

Compare that to the picture at the top!

The side cutters are now a little stubbier, but fully functional. They seem to cut better than before. Yes, it’s the same side cutters. The Mastercraft logo appears to have left out of embarrassment.

We also brought in some old drill bits that we soaked in rust remover. That stuff works wonders. But how well will the bits work? Has the edge been deteriorated by the rust?

Ylab member Gilles brought us a pretty amazing drill bit sharpener from the golden age of Black and Decker. Search all you want at any of the local hardware stores and you won’t find anything like this rig.

You pop the bit into the holder, and it holds it at the perfect angle for sharpening. The chuck has a nice indexing feature to rotate the bit exactly 180 degrees to sharpen both of the cutting edges. Nice depth control too so that the two cutting edges will be at exactly the same depth.

It only took a few seconds and the bit came out like new.

We sharpened up a few. Well, at least three. Because this is no two-bit operation.

Fix-It Night for Crappy Tire Stuff

We have a bunch tools at ylab, and some of them from Crappy Tire. We can call them that – after all, Canadian Tire fought for the use of that name. You would normally think we would be using their tools to fix other things. Nope. We had to fix the tools.

This  Mastercraft drill is about 4 years old, the first 3 1/2 years being unused in a unopened box. Still new, but out of warranty. We used it about 4 times… and it died. No grinding noises. No sparks. Just… stopped.


Opened it up, did a big of poking, and the problem was obvious. That white wire at the bottom coming out of the power cord. It goes into the power trigger. Just touched it, and it came right out. On the other side of that trigger control is a screw that had to be tightened to hold it in place. It was never tightened.


This is the model number, in case you want to not make the mistake of buying this drill. But it is working fine now that we’ve fixed it.

Then we come to our Crappy Tire pliers set. Probably about 3 years old, but still relatively lightly used.

Those insulating handle grips should not be sliding off like that. One of our members has a lightly used set at home that’s doing the same thing, so it’s not just us. We’re testing some decent quality spray adhesive to see if that will hold it in place.

Then there’s the side cutters. Let’s zoom in a little closer


When you’re snipping a wire, it’s the end of the wire that’s supposed to snip off, not the end of the side cutter.

Unfortunately, we don’t have a way of fixing that. Well, some of our members do… but it would not be worth the time and effort.

Come on, Crappy Tire. You should be doing better than that.


Ylab Fall Kick Off: Celebrating the 150th Anniversary of the Periodic Table of the Elements.

Your high-school periodic table was never this cool.

UNESCO has declared 2019 to the International Year of the Periodic Table to celebrate the 150th anniversary of the Mendeleev periodic table. You know, that thing you studied in high-school chemistry.

Ylab member and high-school chemistry teacher Karen could not let that go unnoticed. Working with her students at  o they built their own giant periodic table.

The periodic table is proudly displayed at the school and looks fantastic.

Students made illustrations for each element and mounted them in CD jewel cases.

Karen made use of ylab’s laser cutter to add some framing, labels and other great touches.

Congratulations to Karen and all her students for this great effort!


You’re doing *what* with a microwave???

Don’t be a hero.

Many pages on the Internet tell you how to make a spot welder from a discarded microwave oven. We always thought it was a crazy idea. And then a couple of the more experienced ylab members told us it made sense and would not result in electrocution or being nuked into a medium-rare meat sack.

That explains some of the microwave parts that were lying around our workshop.

Like any good project and action hero movie, there has to be a critical failure and despair moment. Ours happened during disassembly.  Newer microwaves don’t have the kind of transformer you need for the project.

This isn’t what microwave transformers look like on all those other web pages.


Yeah, manufacturers cheap-out nowadays. You gotta do something to get that price down to $79.

Fortunately, some of the ylab packrats better-equipped members have accumulated some gear over the years and may be under pressure to clean out basement/storage shed/living room/all of the above. A nice one was donated to the cause, along with some awesome copper channels for the spot-welder arms.

This is what a *real* transformer looks like.


Channeling our excess energy with copper.


We won’t get into the detail of how the transformer was modded because (a) other websites have that info and (b) please don’t sue us. That big black cable may have been added as part of the process.

Since spot welder transformers allegedly produce some heat, we decided to make use of the microwave fan.

And that nice, shiny stainless steel enclosure… can’t let that go to waste. A bit of sawing, bending and shearing later, we have a pretty good cover.

Microwave enclosure – before surgery.


An old light switch a PC power cable, some drilling and tapping or the copper channels, and the project is moving ahead nicely.

Action hero movies always have moments of suspense. So we’ll leave you in suspense and post later on how this wraps up. Because we haven’t wrapped it up yet.

Because action hero movies have sequels.

Ylab and A.I. North team up: Python crash course on Sept 20

YLab Code Python


Ylab member Lucian has been running the Artificial Intelligence North meetups for the last couple of years at Markham Public Libraries’ Angus Glen branch. He’s had an incredible variety of quality speakers and topics  – machine learning, neural networks and more. Click on the link to see for yourself.

The meetups have been managed from ylab’s meetup.com account. To allow us to do even more, we’re decided to bring it all to ylab’s home at the David Dunlap Observatory.

Hosting the events in our maker space will give us more flexibility on duration of events, as the library closes at 9 PM.

To prove it, we’re kicking off A.I. North’s fall season with our Python crash course for programmers. It will run from 7 PM to 10 PM on Thursday, September 20, 2018.

Python has become a dominant language for A.I. development and we want to get everyone interested through the basics. We’re hoping to do a lot more with it and some of the major A.I. toolkits in future sessions.

This is not a beginner’s programming course. We are targeting people who already know how to program, so we’ll be going quickly in to the features of the language. It’s a lot to do in 3 hours, but we’ve done it before and everyone got through it.

A dozen programmers came out to learn the language.

It’s a hands-on course, where everyone should come with the language pre-loaded on their laptop. We’ll be covering:

  • Basic structure for both procedural and object oriented usage of the language
  • Structure and use of libraries
  • The major data structures
  • Basic database access libraries – with a Postgres server to test!
  • Basic web access

It’s a lot to cover in three hours – but that’s the beauty of Python. If you already have some programming skills, you can move fast. 

As always at ylab, we’ll be putting up the sample code and any slides on the web after the class.

We are charging a small fee for this event, and you can register here. Because, like, we pay rent for our space. We’ll have some cookies and beverages for the break. Spots are limited. Breaking news: we just listed the event, and it’s already half sold out before we finished writing this post! Our last class also sold out.

Big thanks from both A.I. North and ylab to  Markham Public Libraries. They generously hosted events to help both groups get started, and we’ve co-operated on maker days and their excellent PechaKucha series. We look forward to working with them in the future.

Radio Open House: New Faces, New Ideas

Great to see many new faces at our amateur radio open house on Monday, June 25. In addition to the presentation and discussion around the various aspects of amateur radio, we had a great group of people from Toronto Mesh.  

Directional antenna for mesh networks.

They are active in several areas of distributed mesh networks, and are putting a lot of effort into getting people educated. Some of them are playing a part in the our networks conference from July 13-18 that includes 2 days of seminars and 3 days of code sprints.

In addition to some classic ham radio decks, we showed off some really inexpensive technology like SDR (software-defined radio) USB sticks. Originally designed for terrestrial digital television, they can scan a full 6 MHz band, and are available with antenna and accessories for around $25.


Cheapo RTL-SDR USB wideband radio scanner. See the difference between CBC and Virgin Radio?

A copy of our presentation can be found here, and it includes links to the cheap radio sources and ylab Canadian ham certification material we covered in the presentation.

Repent from your unlicensed radio usage! (Actually, just a home-made Yagi-Uda antenna. Yes, that’s a cut-up tape measure.)

We’re looking forward to more radio nights – and our next open house – Drone night – on Monday July 9.