CNC with Shapeoko2 and Easel
Ylab’s introduction to CNC
When you can’t laser it… CNC it!
Overview
CNC – Computerized Numerical Control – is a terrible acronym for computer-controlled machining.
At its simplest, like on our Shapeoko 2 machine (we’ll call it S2 to save typing), it’s referred to as 2.5D or 2 1/2 dimensions, with X-Y movement of the cutting head across the platform, and controllable carving depth on the Z axis. That’s a fancy way of saying that we can carve into or cut up a flat surface.
Higher end machines will have 4 or 5 axis control, which means you can turn the cutting head horizontal and cut in and out and all sides of the object. If you have one you want to donate to us, we’ll figure it out and post some notes about how to use it.
To CNC something, in addition to the machine, you need:
- Some form of CAD software to lay out your design
- Software to convert the CAD design to G-code
- Software to feed the G-code to the CNC machine
G-code is almost universal for controlling machines. It’s used for 3-D printers, lathes and all kinds of other equipment.
Steps 2 and 3 are frequently combined in one piece of software. Advanced CAD software like AutoCAD can combine steps 1 and 2, allowing you to create your design and generate the G-code, but might not have the interfaces to feed the G code to your machine. Some machines – 3D printers are a good example – will accept the G-code on an SD card or USB memory stick and process it on their own.
While this intro uses Shapeoko2 and the Easel software, the lesson will apply to any CNC machine that works with Easel, and we do our best to explain the basic principles that you can apply to any software.
Our Shapeoko 2 machine
Our Shapeoko 2 (S2) machine is a 2.5D machine with pretty simple controls. We posted here about some customisation we made to it. None of that affects its usage.
S2 uses an Arduino board as its basic controller with an Arduino shield (that’s what Arduino add-on boards are called) for controlling the machine. In our pictures, they are enclosed in that green box on the side.
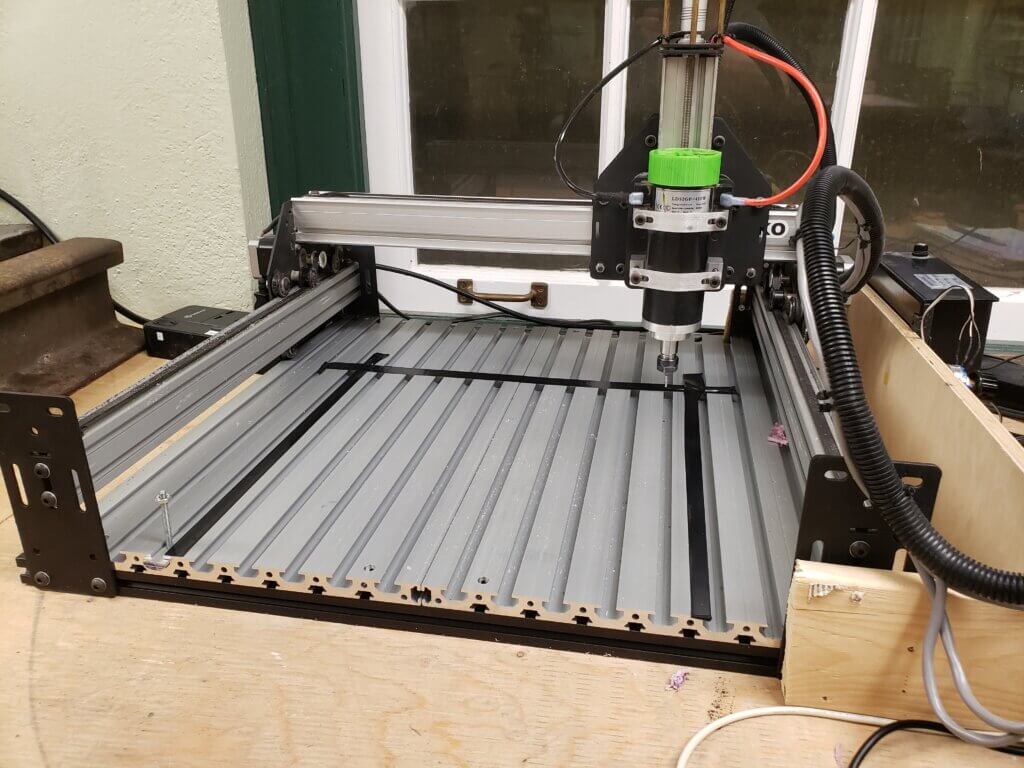
While the bed is about 400 x 400 mm (X and Y), the usable area is about 300 x 300 mm because of motors and wheels on the travel mechanism. In the pictures of our machine, the usable area is outlined by the black tape we put on the bed. The extra space on the bed is useful for mounting clamps and brackets to hold down the material.
The S2 controls are pretty basic. There is no absolute “home” position (X-Y) and depth(Z) for the cutting head. You set the head to where you want it before each cut and the software works it from that point. As long as you don’t turn off or manually reset the position, the software can remember your origin for the next cut.
Carbide 3D sometime/somehow acquired the Shapeoko technology. They have developed newer machines and provide their own free Carbide software to run them. Unfortunately, they’ve completely abandoned the S2 and their software doesn’t support it.
The Easel software and web site
Easel is a website+software that combines all three CNC requirements – design, G-code generation and machine interface – for the S2 and other CNC machines. It works from Windows and Macs.
- You do all your design and machine control work from their website
- You load the drivers for your CNC machine on your PC and somehow the website interacts with it to get the job done.
It has lots of great features, including a simulation of the cut that you can run before doing the real thing.
Free Pro trial for 30 days, then automatic downgrade to Basic version
Yes, there is a fully free version – but it’s not immediately apparent.
You always start with the free Easel Pro 30 day trial. If you don’t buy after that, you’re downgraded to the Basic version. All the details are on their Easel web page. It’s only when you get down to the version feature comparison table that you see that the free version kicks in after the 30 day Pro trial. We won’t bother with a feature comparison here – it’s all there on the web page.
This lesson mostly sticks with the basic features. We’ll let you know when we’re talking about something that requires Pro.
Cutting bits, cut types – and some related gotchas
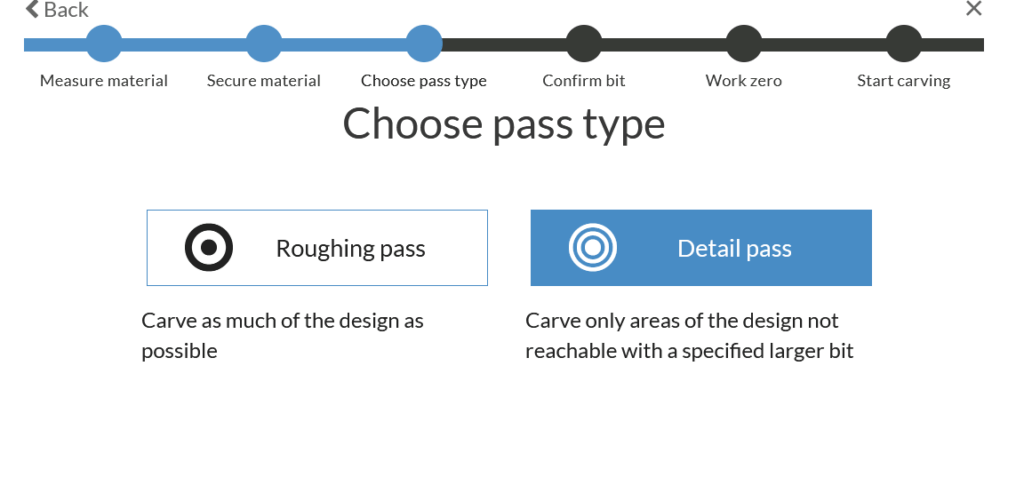
Cut types – pockets and edges
Here’s a bit of a gotcha in the Easel software we will be using.
Depending on which screen you are on, they use two terms for what are essentially the same thing.
- Pocket or Roughing Pass, or the hollowing out of a shape. For instance, the full interior of a circle
- Edges or Detail Pass, which can be one of three types:
- Exactly on the line of the shape you draw (say, on the circle)
- On the inside of the circle
- On the outside of the circle
Milling vs Drilling
Drilling bits go up and down, drilling into the material, cutting from the tip
CNC machines and vertical mills can use milling bits, which cut by moving from side to side. They typically can also drill in, but that’s not their primary purpose.
There are a variety of cutting bits available that are generally described by 4 characteristics
- Shaft diameter – it has to fit in our router!
- Bits we have are 3mm and 1/8″ (3.125mm).
- Both sizes work great
- Cutting/Milling edge diameter
- For class, we are using 1/16″
- As small as 1/32″
- Larger diameter means faster pocket but can’t do fine detail
- Cutting/Milling depth
- Must be as long as the depth you want to cut
- Number of “flutes” (cutting edges)
- From 1 to 4. More give a finer cut
- Different bit ends
- Engraving and V shaped, fishtail, ball-nose (vs square)
- Material (how it’s made) – HSS, Solid Carbide, Carbide tipped, Tungsten carbide, Polychristalline diamond
- Flute/cutting edge number and type
- Quality
- The smaller the diameter, the harder the material, the more critical
- $25-$50 not unusual for 1/16″ tungsten carbide bit if you want to do aluminum
Best sources of information:
- All3DP (we also refer to them in for 3D printing materials).
- Eternal Tools’ beginner guide to End Mills
- Also many youtube videos.
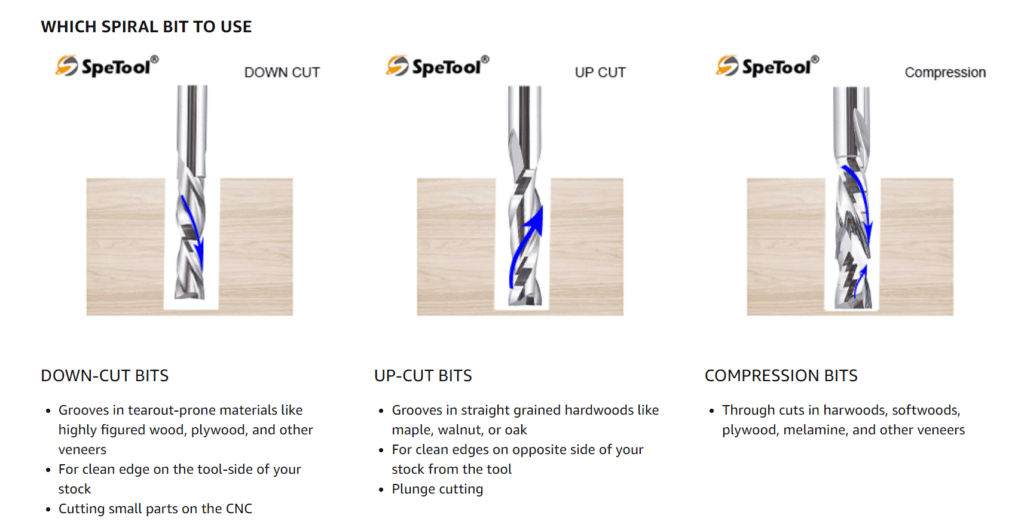
All3DP recommendation for starter bits:
- The 2-flute cutting spiral bit is an excellent all-purpose bit if you’re still in the prototyping stage and don’t want to purchase 20 bits right away.
- The 60° V-bit is also a wise choice for engraving, making signs, and cutting letters.
Easel supports different bit types, and in the Pro version, your design can use multiple, with a bit-change in the middle of your cutting job. You will see the different types when we get to the Easel bit selection menus.
Materials – what can you cut?
Materials depend on two things:
- Your bit’s ability to cut it
- The software’s support for it
Software like Easel supports different materials, and will control the cut based on the material. Carving a groove or a pocket will take more passes for a harder material, as each one will be shallower. It’s all handled automatically for the supported material.
Easel supports different grades of wood, plywood, acrylic, MDF and aluminum, copper and a decent carbide cutting bit will handle all of these. Copper sheet is used to make circuit board traces!
Bit size’s critical relationship to design detail and scale
We cover this issue immediately because:
- It’s critical if you want your design to come out the way you expect
- If you don’t understand the rules, you won’t understand why your cut job is failing
- Easel will simply ignore the stuff it doesn’t like, with no explanation
Your feature can’t be smaller than your bit size
If your bit is 1/8 inch in diameter, don’t expect the machine to cut 1/16 traces. Easel is configured with the bit size, so it knows what it can or cannot do. Easel will go on with the rest of the design and completely ignore the smaller features, with no error message or explanation.
You scale down your design – and now it looks like crap
When you scaled it down, some features are now smaller than the diameter of the bit. So Easel ignores them.
You scale up your design or it’s big to start with – and it’s not hollowing out the centre
You have two separate cuts – one for the outline, and one for the pocket.
If your feature is less than 2X the width of your cutting bit, then the edge cut on one side and then the other completely hollows out the centre. You don’t need to do the pocket cut. And sometimes, you just misconfigure your cut process so that it doesn’t have the pocket cut. You don’t notice because the two edge cuts covered it. But scale up your design so that the feature is more than 2X wide, and now the centre isn’t cut out. You only have the outline.
You scale down your design or it’s small to start with – and a feature is completely missing
Like the preceding issue, it has to do with the two separate cuts – the outline and the pocket.
If you only configured the drawing for the pocket and your feature width is a little wider than the bit, then just cutting out the pocket and not the edges might look normal to you. You might not notice that your cut should be a bit wider.
But if you have a feature that’s narrower than the bit diameter, it won’t cut it at all.
This is really confusing when you have multiple features in your design. Easel will cut the ones that are wider than the bit diameter, and will ignore the ones that are smaller. It leaves people scratching their heads. The help forums are littered with descriptions of jobs failing this way, with no explanation. Let’s just say that we figured this out the hard way and leave it at that.
The funky part: for edge cuts, Easel doesn’t care. It just runs it.
Edge cuts will always go through. There’s no checking of width. So with a big bit, you might be in for a nasty surprise.
But this only applies if you’ve configured it for edge cuts. If you set it up to only do the rough/pocket, it might not cut at all (if width is smaller than bit diameter) leaving you scratching your head again.
Easel’s visualisation/simulation
Easel has a great feature that gives you a 3D representation of you job, and will even simulate a carving run for you. Nice. But all these issues we just talked about that prevents a cut from happening? The 3D visualization and cut simulation may work fine… and then your cut job doesn’t finish. Which leaves you scratching your head even more. If you have dandruff… bring a vacuum.
The problem is usually… you. You set it up as a two-bit job requiring a bit change and a restart. The simulator doesn’t simulate the stop and reload and just runs through it.
Design elements/objects in Easel – or other CAD program
You can draw out your design in Easel or in another CAD program – or combine features of the two.
We assume for this lesson that you have basic CAD drawing experience. If you don’t, look for some of the
Importing designs/images into Easel
Easel can import part or all of your design from another program. For importing stuff, SVG files are preferred. If your CAD or drawing program doesn’t support SVG export, you can convert it using web sites like Convertio or the conversion feature available in Google docs. Both support converting almost anything to almost anything. Both can convert images to SVG drawings
Some tips for converting:
- Make it big. Scale up your drawing. If generating text and snapshotting it, go to a big font and make it big on the screen. If the feature is small, the conversion programs can mess it up. Scale it back down after importing
- Clean up the garbage. If there are artifacts on your drawing, remove them first. A common error when snapshotting text from a word processor is capturing the cursor, margin marks or other features. And blank lines or fix your capture area to make sure you only have what you want.
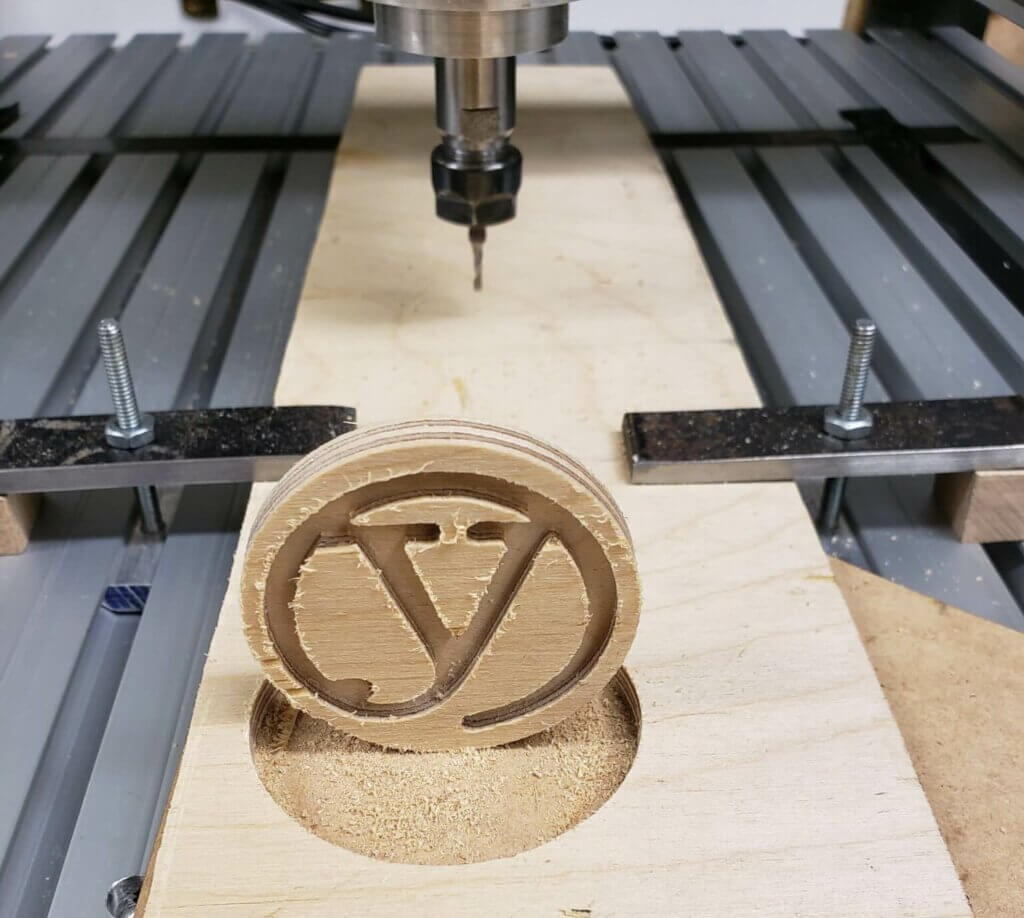
Our first design – an official ylab coaster
Our design will have two elements:
- The ylab logo, which we want to carve into the material
- A circle, which is used to cut out the coaster from the material.
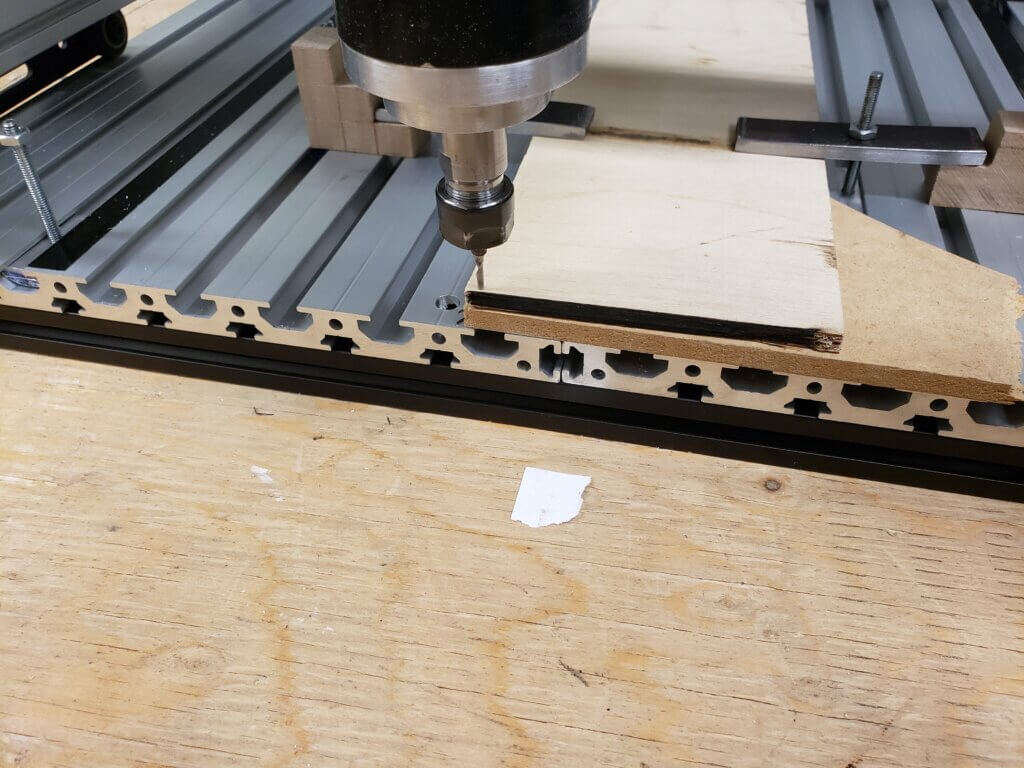
Preparing the material
We have two requirements:
- A layer of base material to put under the material to cut. This is required because we are going to cut out the coaster from the material. The bit has to go all the way through. While we can provide precise measurements, it might still pop through the bottom. We don’t want to be carving into our CNC machines base. So we use a layer of material that is the same or easier to cut than the coaster material.
- Anchors or brackets to bolt the material to the CNC base. This is critical for CNC, since the cutting head will be pushing side-to-side to make its cuts.
We will be using 1/2″ plywood, and we put a layer of scrap MDF under it.,
To hold it down… our maker space has some talented metal workers. OK, one guy, our Metal Master Miro.
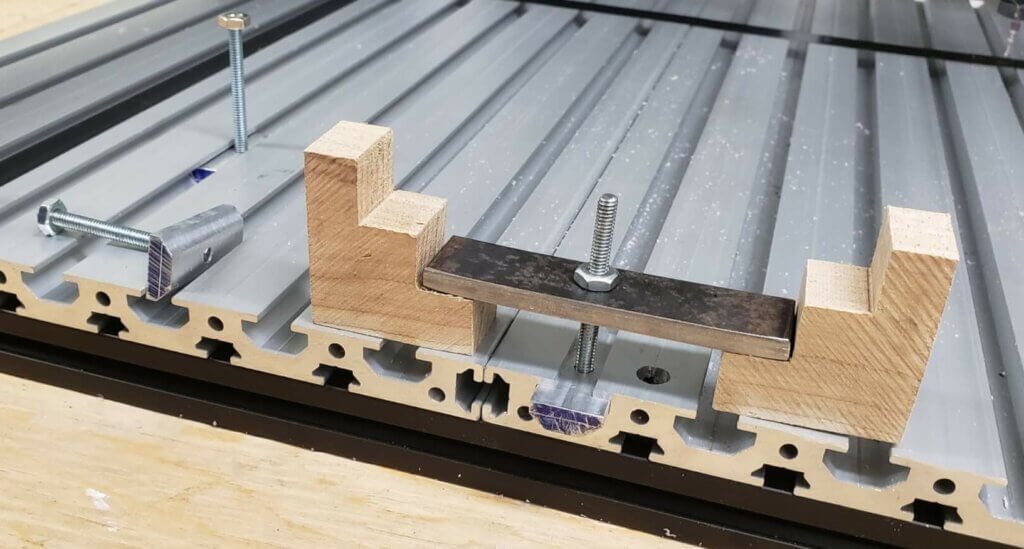
He’s milled some trapezoidal blocks that fit right into the channels, tapped and and threaded them, put in some threaded rods and secured them with Loctite Red. He cut a few metal bars and drilled them so they fit over the threaded rod. Then he made some wooden stepped blocks with a variety of step sizes for holding down materials of different thicknesses.
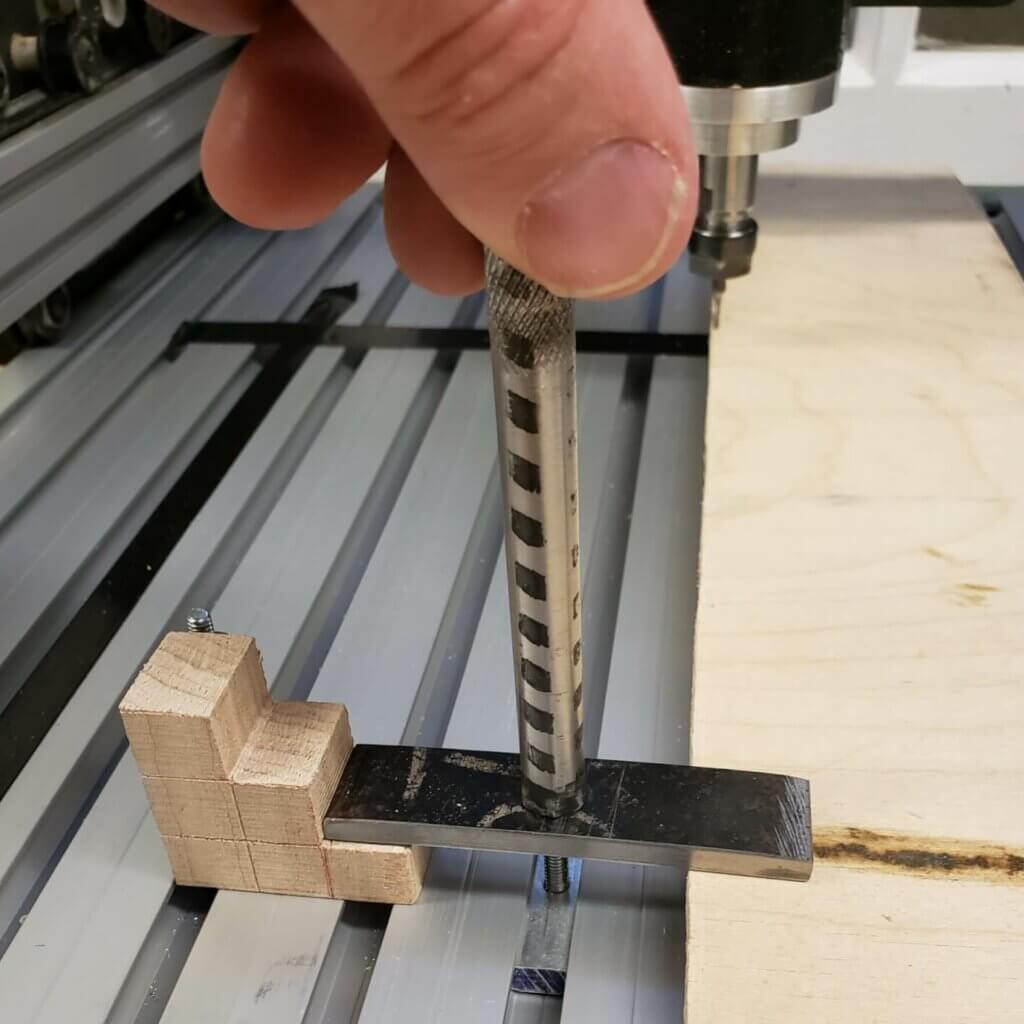
And to tighten up the nut on top of the bar? He made a custome socket and knurled the top so we can get a good enough grip to finger-tighten the nut.

We have a whole bucket of these parts to tie down practically anything.
Preparing the job design

This is our ylab logo (trademarked!) that we need to convert to SVG for import into Easel.
If you have a CAD or design program with the capability to convert it, use it.
If you don’t, convertio is a great web site that will do it for you.
Pro tip: whatever image or text you put in, make it big before putting it through the conversion. It helps with the detail.
Starting the Easel software/web site – and configuring for your machine
If you haven’t taken care of it already, go the the Easel website, create your account, and download and install the driver as instructed.
Have your CNC machine hooked up when you install the software. The installation process will take you through testing and setting the parameters for your machine. Easel makes it easy and does a great job guiding you through the process.
Once it’s set up , you get this interface.
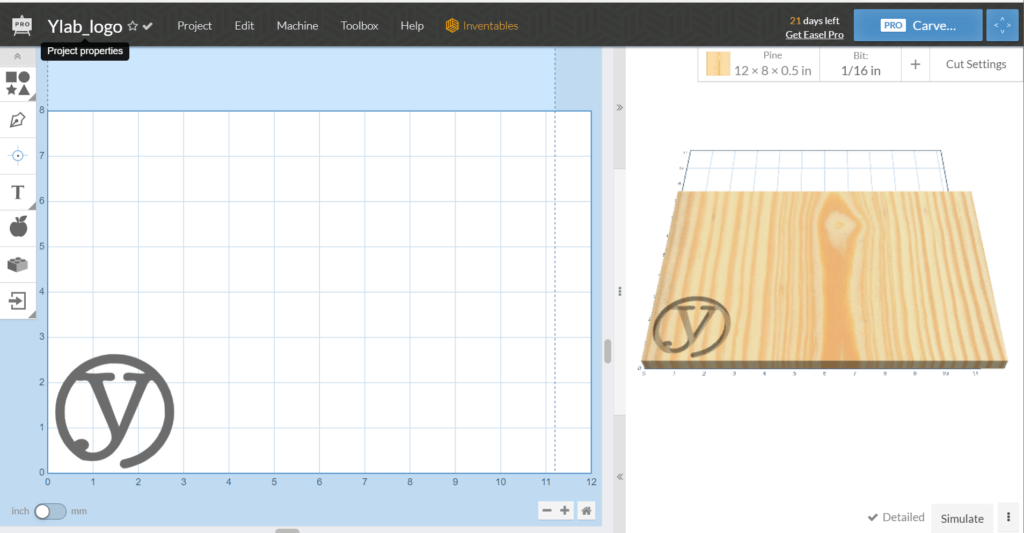
- The left side is where you lay out your design
- The right side shows you what it will look like and allows you to simulate the job
- At the top of the simulation image, you select your material type and cutting bits. The + button allows you to add a second bit (Pro feature) for different elements or parts of the cut. You can use one bit for the edges and another for the pocket carving).
- When you select your material type, you will also specify it’s thickness.
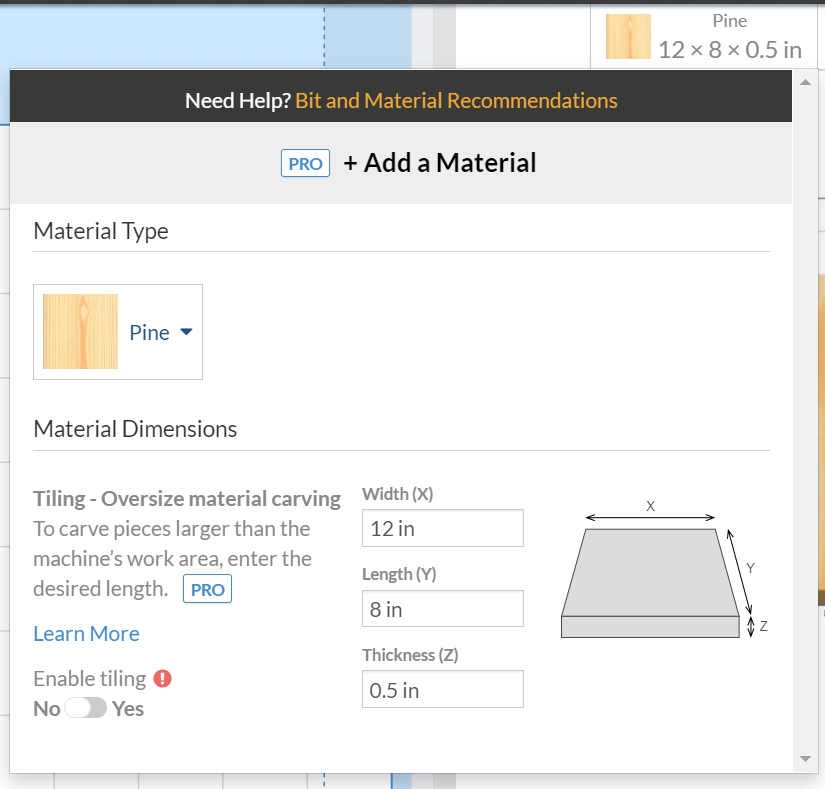
The parameters for the material and bit size are critical. Easel uses them for managing and designing the cut and to prevent you from making stupid mistakes.
- Cut settings. You can look at the values by clicking on the Cut Settings button near the top right of the screen. These are set automatically for you based on the characteristics of the material. You should not need to touch them.
- Stopping you from making stupid mistakes. What if your design is bigger than your material? What if you have set it up to carve deeper than the thickness of the material? Easel checks all that for you.
EASEL WON’T KNOW IF YOUR BIT IS LONG ENOUGH TO CUT THROUGH THE MATERIAL!!! If you plan on cutting through a 1 inch board, is your bit long enough to go through?
Importing and finishing our design
We can import our ylab SVG file using the boxes on the left side of the screen.
The one at the bottom (arrow going into a box) is for the import. It will accept SVG, g-code and DXF files.
After importing it, size it as appropriate for the material. The grid box size is based on the control at the bottom of the screen (inch or mm), so it’s easy to gauge the size. Move it to the middle of the screen so that it’s out of the way for the next step.
That’s the logo we want to carve. But we also need to cut out the coaster. So we add a circle around the logo by using the shapes – the top icon box on the left side.
You’ll get a full dark circle – which is not what we want. We only want a border cut.
Click on the circle and a menu pops up. Click on the Cut tab in the pop up.
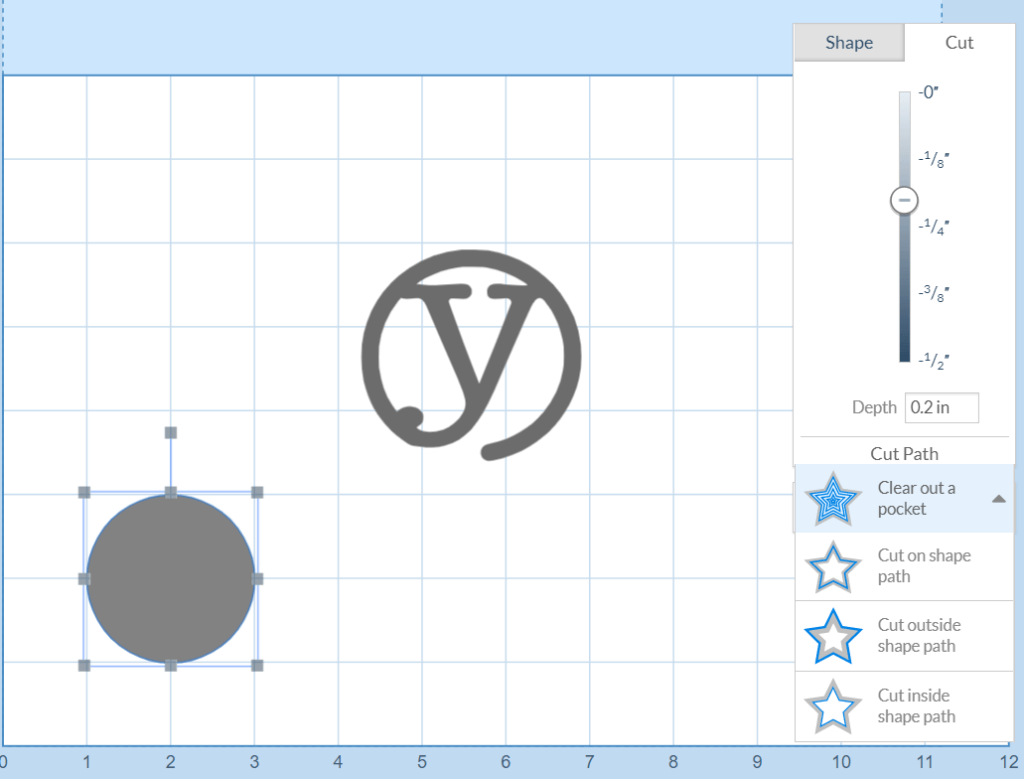
We set it as follows:
- Depth: 0.5 in – because we want to cut out the coaster from the material
- Cut outside shape path. This means the circle as drawn will be the outer edge of the coaster
Notice how the shade of gray goes lighter to darker on the depth slider? The colour on our diagram will reflect the depth. The scale of the slider also matches the thickness of the material we configured.
Now click on the ylab logo and set its cut settings as follow:
- Depth: 1/8 in (or 0.125 in)
- Clear out a pocket
Adjust the size of the circle and the logo so that the logo fits comfortably inside the circle, and place both in the lower left corner with a big a clearance between the circle and the edge.
You should end up with something like this:
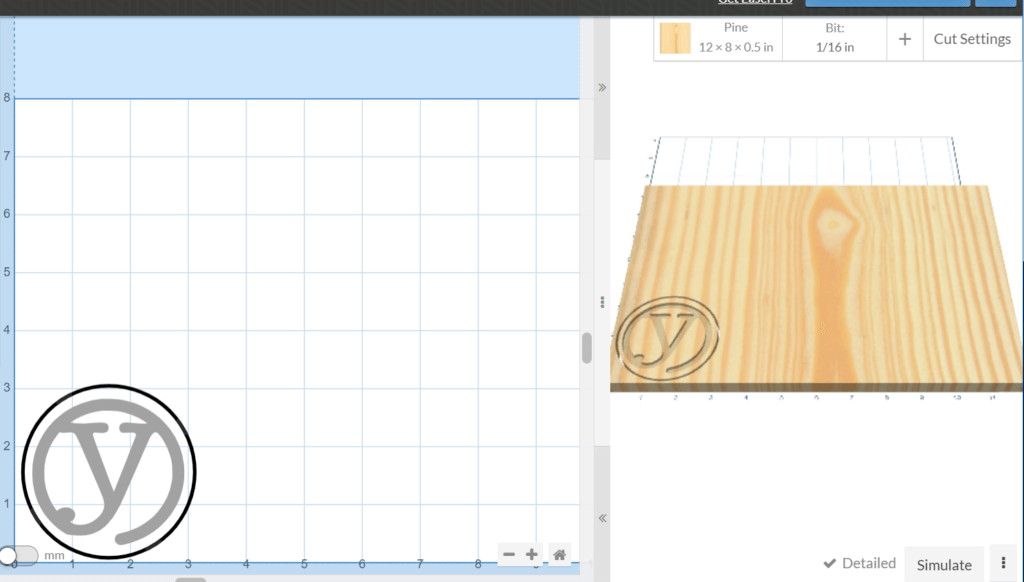
You should notice:
- The separate shades of gray for the logo and the cut circle indicating the cut depth
- The simulation screen shows our material and the two different cuts!
Easel’s cutting order
If you want to be sure:
Run it in the simulator and see what happens.
From our observation:
- Shallowest to deepest cuts
- For same depth, inside to outside
Cutting out your item (vs engraving): not really supported… but if you are careful…
The software and most CNC training material generally covers engraving (digging into the material) and not cutting out a shape from the material
To prove this point, try setting a cutting depth on your shape to a depth equal to or greater than the thickness of your material. In the pre-cut checks, the software doesn’t allow it and will not start the cut.
While not recommended, it can be done if you are careful
- Can your bit handle the depth?
- Cutting edge on some bits is pretty shallow. It might be less than your material thickness
- Will it do it fast enough?
- Engraving a cutting board is one thing. Cutting the board out of a large slab is a whole other ball game
- That ylab logo in aluminum? About 2 1/2 hours
- MANDATORY: Use backing material
- A thick piece of MDF is perfect
- This prevents the bit from cutting into the machine’s bed
- Glue your material to the bed – or use alternate tie-down
- Because as accurate as your measurements are, they are still approximate. This is a cheap machine
- Once you cut through, the pieces will fly and you could damage equipment
- Make it a 2-step process and screw the material to the backing material after the engraving step – if your design allows for that and however you tied it down will not interfere with cutting head movement.
The worst way is to try and watch when it actually cuts through and stop the machine. Definitely not recommended . Your part and the machine can be damaged as it moves off in whatever direction it wants with the router still running.
To get it done, you need to deceive the machine.
- Specify a larger thickness than what it really is for your material. This must be lower than the combined thickness of your material and your backing layer.
- Specify a deeper depth for your cut that is between the actual and specified thickness of the material
It’s better to go with a little more on these measurements.
- This is a low cost machine that does not have perfect precision
- Your initial zero Z placement may be a little off
- Material is rarely completely flat
- Not getting through and restarting is a painful process
Setting up the Shapeoko2 in Easel
You will need to set up Easel account and your PC to use our Shapeoko machine.
You still use the web interface and you need to download a driver that the web program will magically interface with to make the machine work.
Machine definition and specifications
You have two options for setting up the machine:
- Wait until you run your first job. Easel will guide you through the steps
- Do it now by clicking on the Machine tab at the start of the screen
Pay attention to the screens, because the Shapeoko 2 will not appear on the menus. There will be some text at the top of the screen that says something like Click here for Shapeoko 1 or 2.
The options you will want to set for our machine:
- The one with the Arduino controller
- 500mm x 500mm size
- 6 mm belt
- 24V router
- No vacuum.
The process will take you through a couple of tests.
If the software doesn’t detect the machine… the usual. Power it off and back on, and try again.
Single bit please!
Cutting with two different bits is a pro feature that you might never use. It also complicates things and can lead cutting errors – even and especially if you specify the same bit for the detail and the roughing work.
If your screen looks like this with two identical bits displayed:
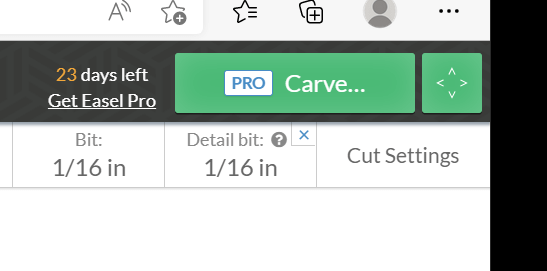
Do yourself a favour and delete the Detail bit by clicking on the little x.
The dual-bit setup is the default when you install Easel. If both bits are identical, a dual setup pointlessly complicates things and can lead to job errors. To learn more about using dual bits for a job, click on the little question mark symbol on the Detail bit button. It brings up a great tutorial. We will also cover it in a later section.
Set the control for the bit you’re using. For this lesson, we recommend the 1/16 inch. It will be slower than a thicker bit, but allow more detail and precision. Slower is good for beginners, as it allows you to see what’s happening.
Controlling the cutting head position and router
That button with the four little arrows at the top right brings up the manual CNC machine controls.

Click on the appropriate box (0.001, 0.01, etc) for how much you want to move with each click.
Our simple S2 machine requires you to manually set the origin (0,0) position before the start of each cut.
If you properly set up your machine, you should be able to try moving the head now. Make sure you’ve connected the USB cable and that everything is powered up!
Power and controls on ylab’s S2
This is how we’ve set it up at ylab. Your setup may be different – and better.
- Shapeoko 2 has two separate power supplies:
- One for the X-Y-Z controller and stepper motors (“Board”)
- One for the cutting motor (“Router”)
- We’ve set it up with a power bar with separate switches for each one
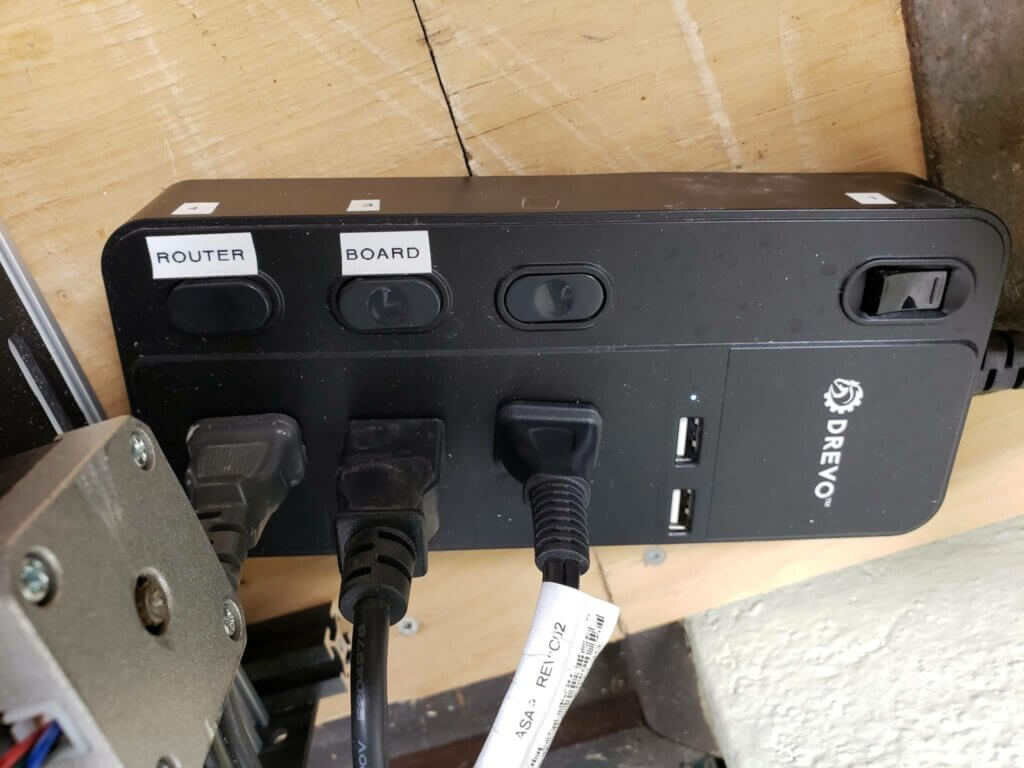
The router has a variable speed control that we’ve mounted to the side of the chassis.
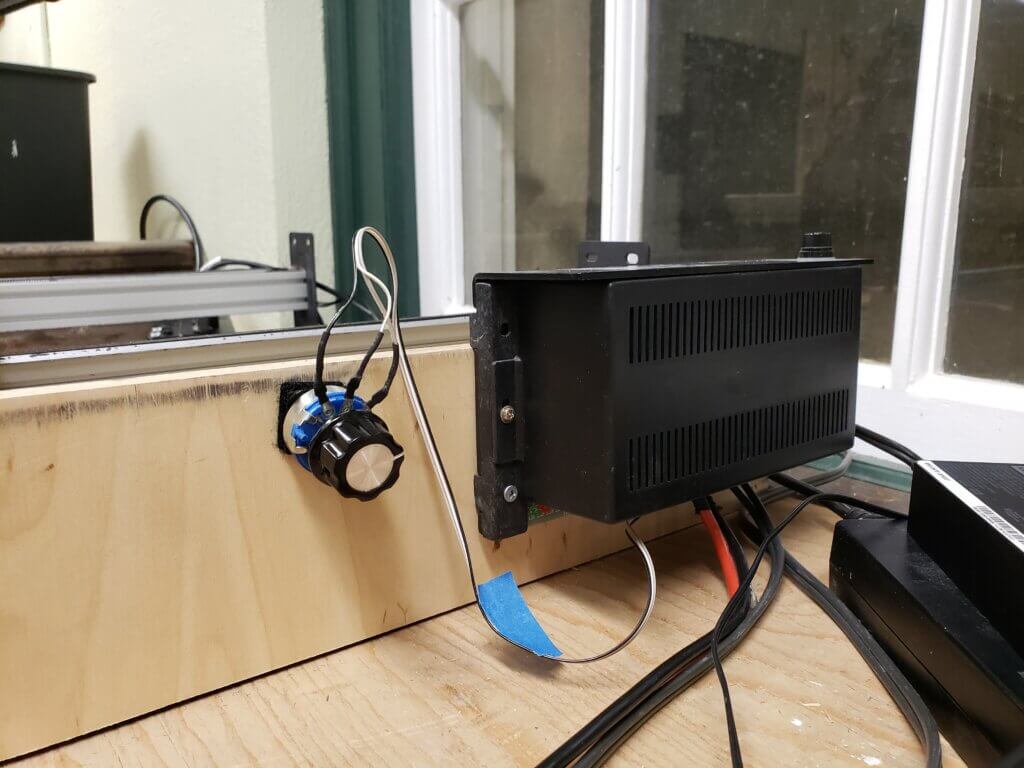
So to turn on the router bit, you need to start it on the power bar and fire it up using the rotary control. General rule is that faster is better.
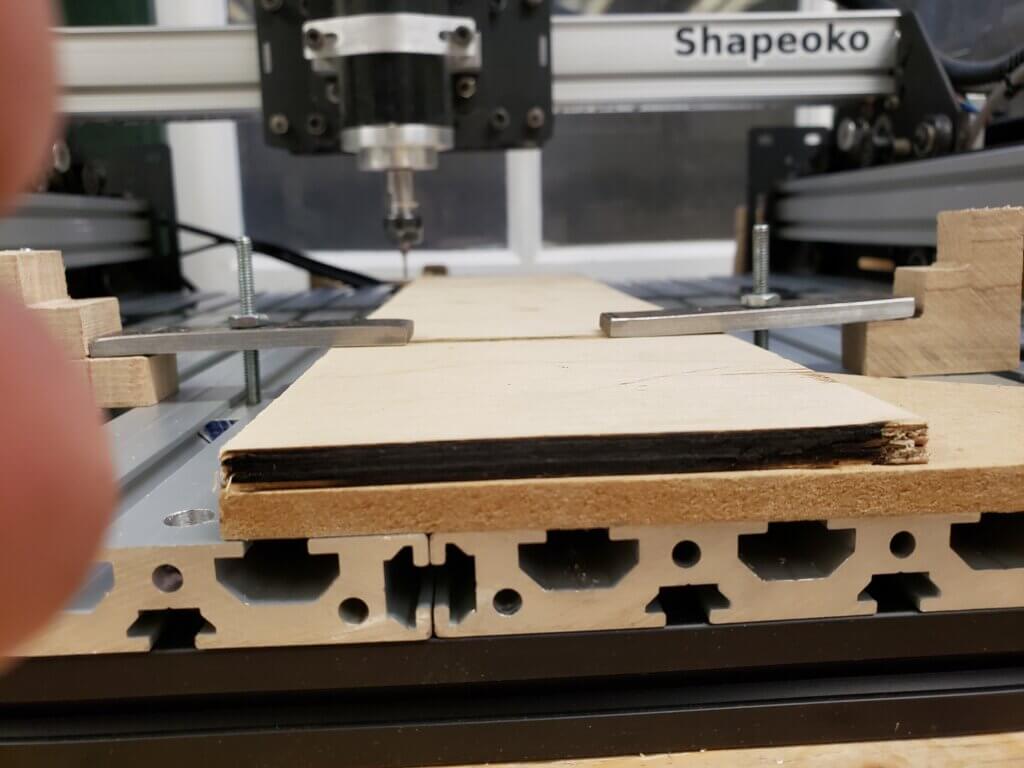
Planning on cutting out? USE BACKING MATERIAL!!!
See picture below.
It’s ALWAYS a good idea to use backing material.
Otherwise you are carving into the machine’s bad. And that’s a bad thing.
Setting the origin (0,0) position.
This being an S2, we have to set our origin position ourselves to the bottom left corner of the material – to match our design.
- Turn on the power bar
- Turn on the Board button. You will see the little green box light up on the side of the cutter and hear the fan start
- Open the jog control (top right corner button with the 4 arrows)
- Move the Z up to clear any hold downs that might be in the way when you move
- Move the XY to place the cutter in the bottom left corner
Set the Z height to the surface of the material
- Put a piece of paper on the material
- Use smaller and smaller increments
- If you hit the material before you get to the smallest setting, back off one step then go to the smallest
- When on the .001, go down until the piece of paper becomes snug under the bit
Preparing for the cut
Safety first!
- Mandatory: Put on safety glasses
- Mandatory: Put on a dust mask. You should have lots left over from COVID
- Optional: Ear protection. It can get nosy.
- Note your emergency power off options – from fastest to slowest:
- Master power switch on the power bar
- Yank the power bar plug from the wall
- After you start the cut, there will be an icon on the screen to stop the job.
- Have a vacuum cleaner ready. Keeping control of the crud is good for you and everyone else who shares the space.
Starting the cut
Click on the Carve button at the top right, and it guides you through the process!
- It will ask you to confirm:
- Material type and thickness
- That the material is locked down
- User Roughing Pass (in our test, Detail Pass only did the outline)
- Confirm the bit type and size
- Confirm that you’ve set the router to the origin (0,0) position
- You should have set you position by now
- Click Use new position
- Almost ready screen:
- Click Raise the bit
- Turn on the spindle motor for the bit by
- Powering on Router on the power bar
- Rotating the knob on the side beside of the chassis beside the power supply. Fast is better.
- Click to confirm
- Click on Carve!
- Start working that vacuum cleaner!
That last step is very important. Bits of crud get in the wheels of the CNC carriage. As they wear, you cuts will be less precise. DON’T WAIT UNTIL THE END OF THE JOB – ESPECIALLY IF CUTTING METAL.
After the cut is complete
- Turn off spindle motor
- Raise the cutter away from the material (Z axis)
- Move the cutting head to the back of the machine
- Turn off the machine on the power bar
- VACUUM! Clean up after yourself!
Try different materials
We used plywood, MDF, pine, and acrylic/plexyglass. All worked great!
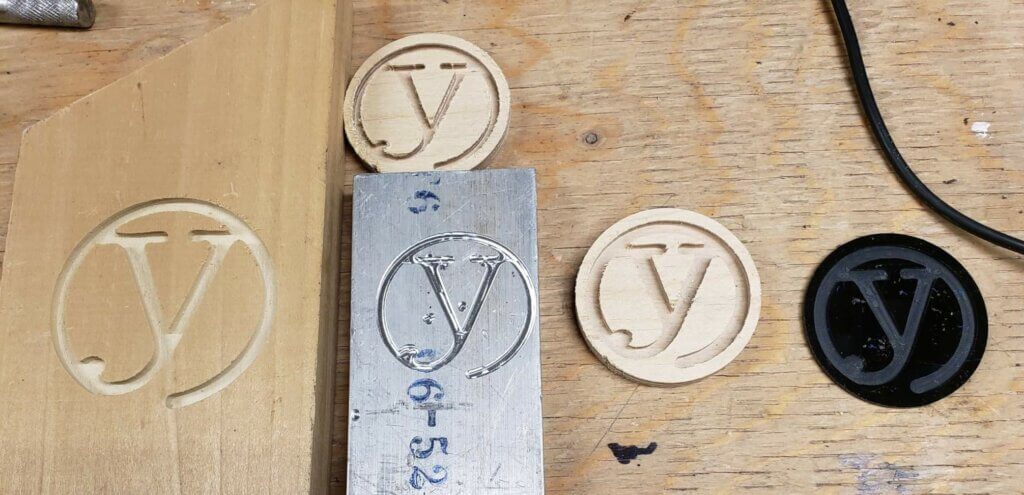
Some material notes:
- Solid wood gave us the best results
- Plywood could be a little raggy on the edges. Depends on the grade.
- MDF produced the worst results
Other tips
- For cut through, exaggerate the material thickness and cut depth. If using 1/2 inch thick material on a 1/2 inch safety piece, you can claim the material is 3/4″ thick. Set your cut depth to a little deeper than 1/2 inch to make sure it gets through – like, maybe 0.55 inch.
- For a bigger design, a wider bit will work a lot faster. But don’t forget that it might be too wide for fine features. That’s where trying a dual-bit setup might help.
- If your surface is uneven, adjust your Z height and depth accordingly. Wood isn’t always flat. Make your starting Z height a little above the surface and move it around with the X-Y jog controls to make sure it doesn’t hit anything. Make your cut depth a bit deeper to compensate.
- Nervous? Not sure? Test with styrofoam!
- Raggy edges? Are you on dual bit? If your edges are raggy, you may be on a dual-bit setting that only did the rough/pocket cut and didn’t do the edges. Dual-bit cuts require you to start each cut separately.
- Wood: better finish if cutting is parallel to the grain. This is an Easel Pro feature
- Laser cut or CNC? ylab members have the luxury of both!
- Our laser cutter will do more precise cuts on the X-Y access
- The CNC is more precise on the depth
- CNC doesn’t leave burn marks – which is great for project like a bamboo cutting board
- But for some projects, you want that laser burn for appearance!
- CNC can handle materials that laser cannot
- PVC and other chlorine materials that are prohibited in the laser cutter because they burn and release noxious fumes
- Thicker plywood, where the adhesive between the layers catches fire on the laser cutter
- Cured carbon fibre, fibreglass and other materials that, like plywood, have adhesives or bonding agents that burn before the material itself.
- Project is bigger than the bed length?
- You can’t go wider, but you can go longer
- As long as you can slide it in, you can run it.
- The tiling feature in Easel allows you to do the job in multiple steps or pieces. The Easel site has more info.
Machining with 2 separate bits
Run a few jobs with a single bit first. Get used to working in a way that preserves your initial X-Y position by returning the milling head to that spot at the end of a job.
- Setting up your initial position and depth
- Ensure that your job ends by either completing or hitting the Halt icon on the Easel screen.
These are critical, as the start position of the cutting head must be identical for each step.
The two steps:
Think of it this way:
- The Roughing pass is the “pocket cut”… or almost. It will do most of the carve stuff, but not go as close to the edge as it would in a normal job.
- The Detail pass does two things:
- It finishes the edges of the pocket cut
- It does all of the Cut on path cuts
If your job has both engraving and cutting the final piece out of the material, this last step is critical.
Easel is smart enough to do all the pocket cuts first, then cut the material out on the Detail pass. This order is critical, as cutting out the item first moves the piece.
EASEL WILL NOT RUN BOTH FOR YOU AUTOMATICALLY!
- Run your job selecting the rough out cut – and make sure the milling bit goes back to the original start position at the end of the job
- Change your bit while maintaining the same X-Y position. You can move the Z position up and down to make clearance to remove the first bit and install the second bit.
- Set the Z position of the bit to the surface of the material, as we did before.
- Start the cut again, specifying the Detail Pass
- SPECIFY SAME ORIGIN FOR THE JOB!
If you don’t want to do the final cut out of your design using the detail bit, you should proceed as follow.
If you want to do final cut-out with a different bit from the detail bit…
Well, you now have a 3-step job.
- Save your design as two new files with names like -inside and -outside
- From the -inside file, remove the final cut-out elements and run your two pass job
- Be sure to preserve that origin location!
- From the -outside file:
- Remove everything but the final cut-out elements
- Set it up as a single-bit job
- Change to the milling bit you want to use – making sure the X-Y position is maintained, and putting the Z to the surface of the material
- Run the final cutting step while preserving that original position.
Disaster recovery – Cut-us interruptus
So you are running a 2-hour job, and it fails half-way through.
No, Easel does not offer any way of running the job other than from the original start point.
Jobs can fail in many ways:
- Power failure
- Laptop shutting off because you didn’t plug it in
- Fat-fingering the application
- Internet interruption (this software works on-line, remember?)
- Your own “creativity”.
- Nothing is foolproof because fools are so ingenious.
Through experimentation, we’ve found some ways to recover.
- DO NOT MOVE YOUR MATERIAL. Leave it bolted down. If you move it, you will never recover your starting point.
- JUST IN CASE IT DOES MOVE -FOR LONG JOBS: before you start, create locating holes for your material
- Select your starting XY (0,0) position, preferably over some material that is clear of your job. This could be backing material
- Turn on the router
- Slowly drop the head to create a locating hole
- Move the cutting head to a second position far from (0,0) position, noting exactly what clicks and distance you used
- Repeat steps 2 and 3
- Now you have a precise way of relocating your start point and the orientation of your material
Always reset your Z position and specify new starting position
- If your starting X-Y position is good, don’t readjust it. But you still want to specify new starting position in the startup process
- We’ve noticed some weird behaviour on restart from existing position, where the bit unexpectedly drill down through the material… and the bed. STOP MACHINE IMMEDIATELY IF IT DOES THIS
- Adjust your Z depth to the surface of the material as if it’s a new job.
If some areas are already completely cut:
- Save your design under a new name
- Delete the areas that are completely cut. You can do this in Easel
- Restart the job for the partial/remaining areas
For areas already cut, it will air-mill for a while. That’s OK.
If all areas are partially cut:
This process only works if the cut depth is less than the amount the Easel software raises the bit before starting the job.
- Measure the depth already cut. A micrometer can do this.
- Move your bit to the (0,0) position and flush with the surface
- Turn on the router
- Using the manual controls, drop the bit into the material by a little less than the measured depth
- Restart your job, making sure to specify your current position without bringing the bit back up from the hole you just drilled
The software start process always lifts out of the hole, and goes up and down before starting each new layer. It will easily clear the edges of the areas you’ve already milled. Don’t be afraid to be conservative on the existing depth – you will simply air-mill for a while longer.
Project ideas?
Check out the Carbide, Easel and Thingyverse websites. Don’t make me send you this link.
Don’t forget that if you’re looking for projects that can make you money, ylab members’ use of our equipment is for non-commercial purposes only.
Acknowledgements
Big thank-you goes out to:
- Former ylab member Jedi Jay for donating the machine
- Ylab member-and-better-half Craig and Shari for getting the machine running, teaching us the basics and donating some milling bits
- Ylab member Miro for all his work making the tie-down parts and sharing all his milling experience in our tests for developing this material
- The great people at Inventables for the Easel software and providing free licenses to teachers. And especially for continuing to support the older Shapeoko1 and Shapeoko 2 machines… which the Shapeoko provider Carbide refuses to support in their own software.