Your First VHF/UHF Radio and Antenna
It can be this simple
If you are like the vast majority of ham radio operators, your first radio be a dual-band HT or mobile that works in the 2 meter/144 MHz/VHF and the 70 cm/440 MHz/UHF bands. Or maybe you’ll get both. While you don’t get the long-range benefit of HF radios, they have the advantage of being portable, using smaller antennas, and you can connect with repeaters and repeater protocols like IRLP to reach contacts around the world.
We highly recommend that for either or both, your first antenna should be a mag-mount. But before you do that, read on for some important safety and usage info.
Ham-speak translations:
- HT: Handheld transceiver. A handheld radio. Like what you would call a walkie-talkie when you were a kid. Most have up to 5 watts power. Some new crazy ones get up to 8 or 10 watts.
- Mobile: A roughly car-stereo sized radio that can be used as base station or in your vehicle. These can go up to 50 watts
The HT usually comes with a default antenna that’s covered in plastic and known as a rubber duck antenna. It’s not very good.
The mobile comes with nothing at all. Oh, yeah, and you need to buy a power supply. Really.
1. Let the antenna guide your decision
Just accept it. If you are going to be using it as a first radio, you need a decent antenna. While there are lots of options for building a suitable antenna like a ladder-line j-pole, that won’t help you much if you want to use your radio (HT or mobile) from a car. And even though they talk about how cheap you can build it, if you don’t have all the soldering and other tools required, it will probably cost you more than picking up a simple mag-mount antenna. And that’s not counting the time and effort… and then maybe the test tools (beg for help, buy or borrow) to figure out if/how you messed it up.
A good antenna might make the decision for you. If, using a decent antenna, you can reach local repeaters, you may have no need for an more expensive mobile unit.
There are many options for outdoor antenna or for putting an antenna in an attic. But you’re just starting, and you’re not sure you want to start drilling holes in walls. And after you drill holes, you will need to crimp on connectors, and we’re back to that spending money thing again. If you are in a rural area far from repeaters, you may not have a choice.
This is why we recommend contacting and joining a local radio club. You will find lots of advice and people willing to help.
1.1 The mag-mount option.
A mag-mount is a versatile option that may meet your needs.
If you are reading this you should already have your license. If you don’t, stop reading and go here (for Canadians, anyway). If you passed your test and you are still reading, you know what a dipole antenna is. If you want to know more, check our our Antenna, Impedance and SWR page. The dipole is the most fundamental antenna. Pay attention to the gifs in the section on the link.
A vertical antenna – mag-mount or an HT’s rubber duck – is half a dipole. It needs the other half to work. You can look all you want in the box it came in, you won’t find it.
If you mount magmount on your car, the metal of the car is the other half of the dipole. Works great. That’s what it’s for. Case closed.
On an HT with a rubber duck antenna, look in the mirror. You, the meat-sack, are the other half of the dipole. And you are not a very effective half-of-a-dipole.
On a mobile that’s not in the car… you got nothing.
1.1.1 Mounting: Mag-mount needs metal.
So what’s the answer? Not plastics. Metal.
The other half-of-the-dipole for a vertical antenna will either be ground if the ground is nice and conductive and usually with a metal stake in it from the antenna. But that’s for big verticals. This is a little mag-mount. So you need a big hunk of metal. Metal that a magnet will stick too.
Cookie sheets are a popular option. Other big pots will do even better. Trust us. We tried. Go for size. Stick the mag-mount on it, and put it up as high as you can.
BTW: In Ham- and antenna-speak, this hunk of metal acting as the second half of the dipole is called a counterpoise. Impress you new ham friends with your use of this term in the appropriate context. It’s far more useful than mentioning the theoretical isotropic antenna, which just shows your ham friends that you’re a theory git.
2. Location. Location. Location.
Outside is always better, but may not be an option for comfortable use. Like, we’re writing this from Canada. In January. Enough said.
The higher the better. Second floor of the house. In front of window is great.
Avoid other metal. Curtain rods. Metal venetian blind slats. All will be counterproductive for your antenna unless you really luck out and accidentally discover some new combination of reflective metal that outdoes the Yagi. Don’t get your hopes up – if you do discover some miraculous combination of location and metal objects, it will stop working as soon as you move any component – including yourself – by a fraction of an inch. And you will never find that spot again. It’s just how antennas work.
If you are trying to reach a repeater, be on the side of the house closest to the repeater.
3. Radio to antenna adapter
An unwritten rule of amateur radio: if you purchase any two components without triple-checking the connections for each of them, they will not connect.
What’s on the radio? For HT, it’s SMA – but is it male or female? Could be either. On a mobile, it’s mostly UHF female/SO-239, but it could also be BNC female.
The antenna connector will usually be UHF male/PL-259, but there are some BNC male.
Get the specs, and order up the adapter – but be careful with your HT radio.
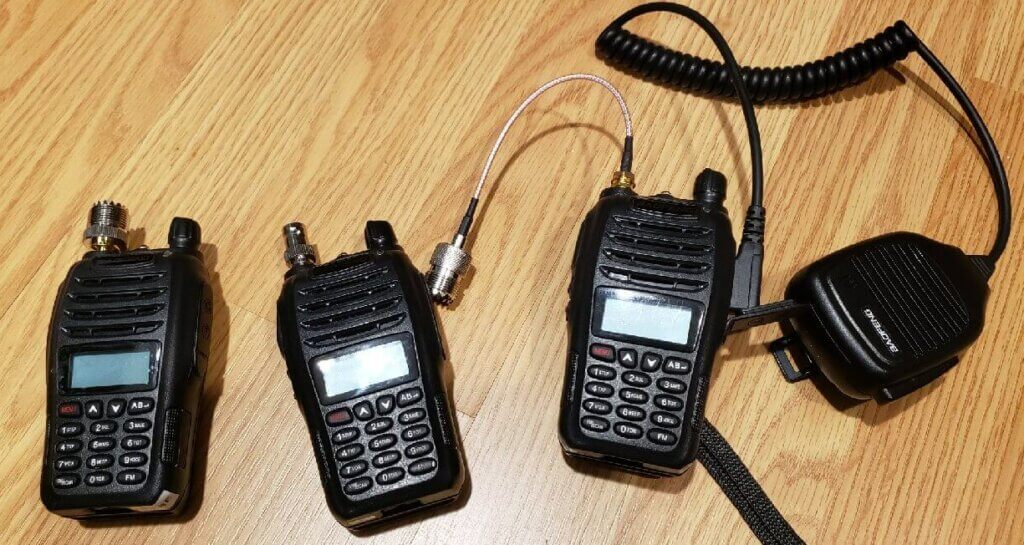
All the radios in the picture have SMA-male connector. The radio in the middle has a BNC-female adapter, which is relatively small. The radio on the left has an SO-239 adapter which is big enough to look awkward and, with a cable attached, to potentially cause enough strain to damage the radio. You run the same risk with the BNC adapter. The ideal situation is on the right – a pig-tail cable and an external microphone. You will be a lot more comfortable than you would be holding up the radio to your ear, with a lot less wear-and-tear and damage risk for your radio.
4. SAFETY! DANGER! POWER LEVELS!
Five watts transmission power is informally accepted as the maximum level for an antenna next to your head – like on most HTs.
We are now seeing HT radios with 8W – 10W of power. If you get a mobile, many can go up to 50 watts.
If you are in your car, it’s not a problem – the antenna is on the roof of the car and you are protected by the roof. But that’s not the case if you are in a small convertible with the antenna on your trunk.
It’s easy to be careless in your house, and particularly if you are using a mobile at 50 watts. Consider using only a lower power level, or, at the least, use the full length of the cable to maximise the distance between you and the antenna. Remember your training: the VHF frequencies between 30 MHz and 300 MHz are the most dangerous for us meat-sacks. If you are going to be operating at that power level, you really should be using an outdoor antenna.
There is some concern that hands-free corded headsets and ear-pieces may be hazardous, as the headset cord can act as an antenna, picking up the radiation and directing it right into your head. A ferrite on the cord may reduce the effects. Do you own research and watch out for crank sites. Yet another reason we like using an external mic.
5. Good and Bad: VHF/UHF Tri-Band and Quad-Band
You can now buy tri-band and quad-band radio that operate in the > 30 MHz range for operators with the Basic license.
Be careful, because there is no standard on what a quad-band radio offers. The extra bands may be at best completely useless, and at worse illegal. It’s pretty easy to import radios directly from other countries, and these radios may not be legal to use in Canada either because they are not approved or because they transmit on frequencies not approved for amateurs in Canada.
Problem: One of the bands crossing the 30 MHz line. We see some radios offering a 26-33 MHz band. In Canada, the 10 metre band oes from 28.0 – 29.7 MHz. The rest of the band on this radio is not approved for amateurs in Canada, and none of the band can be used by operators with only their basic license.
Problem: Other bands not legal for Canada. We see some radios offering 240-260 MHz and 350-390 MHz bands. These are not available to amateurs in Canada. Radios offering these bands will often have higher and lower frequency limits on their 2 meter and 70 cm bands than are available in Canada. (Note: there is a 222-225 MHz band available to Canadian Amateurs – but not on most of these quad-band radios).)
Good: 6 metre / 50-54 MHz band. The 6 metre band was generally not found on older radios. It is increasing in popularity and it’s allowed for Basic license operators (> 30 MHz). With the right conditions, it has excellent long-distance propagation with operators transmitting around the world. You need to make sure you get an appropriate antenna for this band, as most mag-mounts are only spec’d for 2 metre and 70 cm.
An ideal quad-band UHF/VHF radio might be one that supports the 10 m, 6 m, 2m and 70 cm bands – but you can’t use the 10 m band if you have only the Basic license.
6. Digital radios: be careful
Unless you have money to burn, don’t buy a digital radio without really thinking about it and consulting local club members. This is a topic we will need to address separately. The problem: there are different digital “standards” – DMR, D-Star, Fusion – from different manufacturers. They are not compatible with each other. They each require separate repeaters. Buy the wrong one, and you may find that everyone else in the local club and their repeaters use a different standard. Want to start an argument? Mention a preference for one of the variants. And wear protection.
7. Final thoughts
As we said on Radio for Beginners page, set your objectives and go from there.
We’ve avoided giving specific radio recommendations because things change too quickly. There are lots of options, including buying used radios from other club members.
Don’t be seduced by high power ratings. You may do better with a cheaper radio and a better antenna. QRP (reduced power) transmission is a challenge many enjoy.
You may have a lot more fun getting a cheap radio with some basic accessories and using the extra cash to buy tools to experiment with. If you can get to a local repeater or two, it may be all you need for UHF and VHF, and leave you with some money for other projects.
Or your requirement may be to get on the air with the best quality and transmission power.
There are no wrong answers. But there are rushed decisions.