Noobs with Knobs
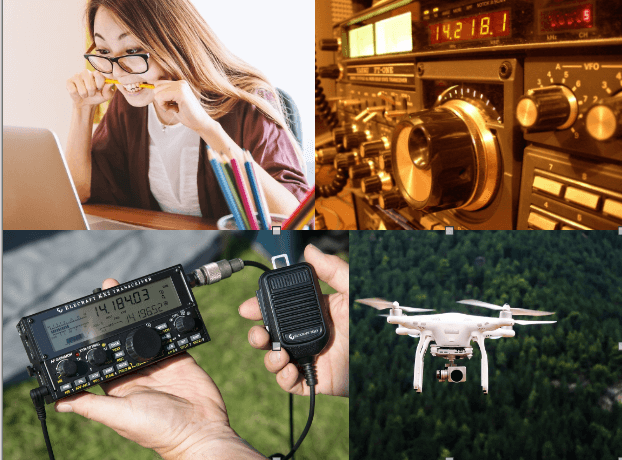
Ylab’s Amateur Radio Page for Beginners
There are a lot of great reasons to get into amateur (“ham”) radio. Learning about electronics, frequencies, analog and digital communications… the hobby is far more than talking to other people in distant lands.
It’s not expensive there are super-cheap kits and gear to get you started and lots of home brew stuff.
There’s a lot of exciting new networking technology out there – mesh communications, extremely low power transmission, and others that are coming into the mainstream in WiFi 6 and IoT. You can use more frequencies and more power for drones and other projects.
Best of all, when you get into it, there a a lot of really smart hams out there who are great at all this stuff and who are eager to help.
But before you get serious, check out Step Zero – things you can do before you get your ham license.
- Step 1: Get your license
- Step 2: Find and join a club
- Step 3: Get some gear
- Step 4: Getting ready to get on the air
Once you’re familiar with all the info, go to our Get on the Air page (coming soon!).
Step Zero: Things you can play with before you get your License.
Without your license, you can’t transmit on the amateur frequencies – but you certainly can receive.
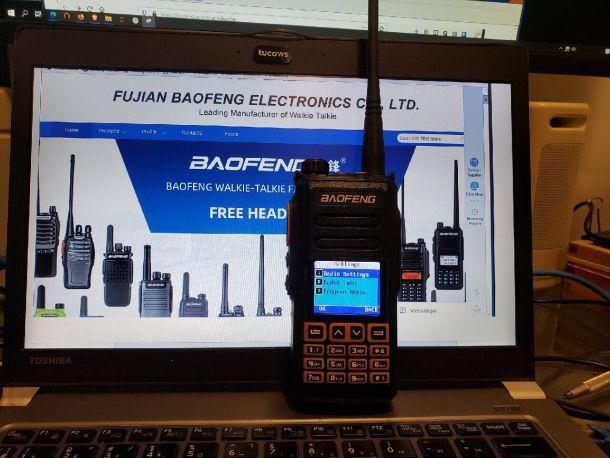
A device we absolutely recommend for anyone interested in communications, science/STEM or radio is the RTL-SDR radio USB dongle. It’s like a big memory stick that you plug into a USB port on your PC at one end, and with an antenna connection at the other end. For about US$35, you get the device and a set of different antennas. You can listen in on all kinds of radio frequencies – amateur bands, commercial radio, airport frequencies and more. Check out our blog entry or our video on understanding bandwidth to see it in action. You’ll learn the basics of some antenna types and sizes – a good thing to know before you start spending money on a bunch of ham radio equipment.
If you absolutely want to start transmitting, maybe with your family, friends or some club you belong to, you can use GMRS radios that you can buy at any big box store. READ UP ABOUT GMRS FIRST – they are not all created equal. We wrote something for a Scout group on the GMRS radio rules and how to pick the best radio. The post covers issues for when you are traveling – some GMRS radios that are legal in Canada require licenses in the USA.
Step 1: Get your License. Use our Training Class
We’ve created a free Canadian Amateur Radio training class that makes it easier than other methods. We’ve tested the material on for high school-age Scouts and their leaders, and all were able to pass the test on their first try.
The class has slides, videos and practice tests. All the material is open-source / Creative Commons, so it’s free for anyone else to use and improve.
Step 2: Find and Consider Joining a Local Club
This is where you will make contacts, get a lot of help, and it may even be a good source of cheap, used gear.
This is the most complete list we’ve found of clubs in Canada. The Radio Amateurs of Canada (RAC) also has a listing but only lists clubs affiliated with RAC.
And don’t be intimidated by the jargon. They’re just trying to help.
Step 3: Get Some Gear – But What?
This is where things get complicated. There are as many opinions on this as there are ham operators.
The three most important questions:
3.1 Objectives
Amateur radio means different things to different people. There’s no wrong answer. Their may be some wrong-headed operators who think whatever they do is best and should be followed… but they are easily ignored. A small list:
- I’ve wanted to communicate with people around the world since I was a kid
- I like to tinker with electronics… solder… build stuff…
- I like to write software
- I just want to meet more people… maybe even help out at community events, or with emergency preparedness
- I’m working with kids… for teaching STEM… for Scout events…
- I hear there’s all kinds of new communication technologies out there – mesh networks… satellite… and I want to learn about it
- All of the above, and more.
There is no wrong answer. If you have more than one goal , prioritize and start to make it happen.
3.2 Location, Space and Antennas
Location, location, location!
Where there’s a will, there’s a way. The antenna is the toughest issue, particularly if you want to work DX (that’s ham-speak for long-distance communications).
There are vertical antennas and horizontal antennas.
Are you willing and allowed to drill a hole in a wall to run a cable from inside the house to an outside antenna?
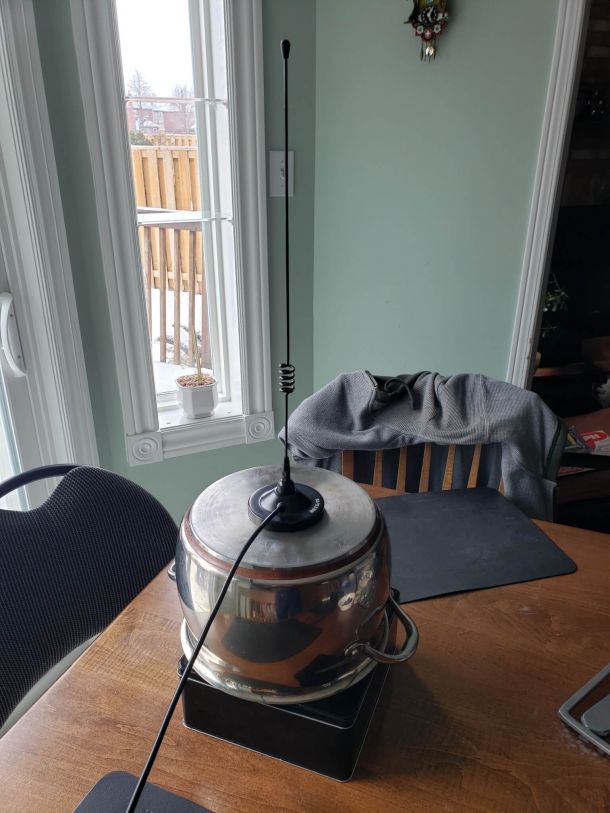
Its difficult if you live in an apartment building where you can’t hang something outside. In an apartment building, you might get away with some sort of vertical antenna on a table or something hanging from the ceiling. If you live in a house, you might have room for a vertical antenne but not have a yard big enough to put up a long dipole or even a relatively shorter G5RV, a design that looks like a dipole but also has a ladder-line vertical element so it really requires a minimum height.
Height is always a consideration. The higher the better.
If you own a home, there are tricks like locating an antenna in a attic or using a metal rain gutter as an antenna. You still need to take care that there are no humans near the antenna when you are transmitting. 50 or 100 watts of power should not be radiating anywhere near your head or other vital organs.
One solution: get outside. Friend of ylab VE3IPS loves wandering out with some portable gear for hikes to a hilltop and making contacts from there. Many newer 6 metre and HF rigs are surprisingly compact and portable. There are great folding antennas. String some wire up across two trees and you have an antenna. Lithium-ion battery packs provide some real punch, and are much lighter than carrying around car batteries.
Thinking about these issues in advance will help you decide which gear is appropriate for you.
An increasingly popular option is the 6 meter band (50 to 54 MHz), which is open to Basic licensees. It requires a relatively smaller antenna, and with the right environmental conditions, can even travel around the world. It generally requires newer equipment, as it is a higher frequency than HF gear historically supports, and most VHF/UHF radios don’t support it either.
Figure out what antenna options you have and work it from there.
Finally, how remote are you from some good repeaters? In or near a major city, you might be able to reach multiple repeaters with a handheld radio – HT or handheld transceiver in ham speak. With 5 watts of power and a good antenna, you can communicate with a good repeater 20 km away or more, and from a properly equipped repeater, you can hop around the world. If you are in a more remote area without the luxury of repeaters, you will at least need a VHF/UHF mobile (think: basic car stereo size) and usually a power supply to go with it that can transmit with up to 50 watts of power and with a decent antenna might get you up up to about 100 km on a good day.
More remote than that, and you are looking at 6 meter band radios if you have your Basic license, or HF radios if you have your Basic with Honors license, Basic with 5 word-per-minute morse code, or your Advanced license.
3.3 What is my budget?
The only thing more innovative than a cheapskate ham operator is a cheapskate ham operator that needs to solve a problem RIGHT NOW!!!
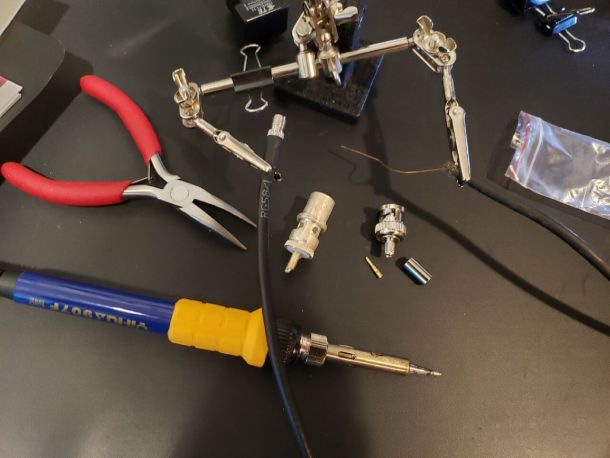
Like the night I was hooking up an HF radio at home for the first time – a nice old one with a lot of manual controls – and I needed CW (that’s ham-speak for morse code) key to test it.
Morse – oops, sorry, CW keys are pretty simple, so there must be an easy way to build one. Some searches on the Internet, and a half hour later I have this.
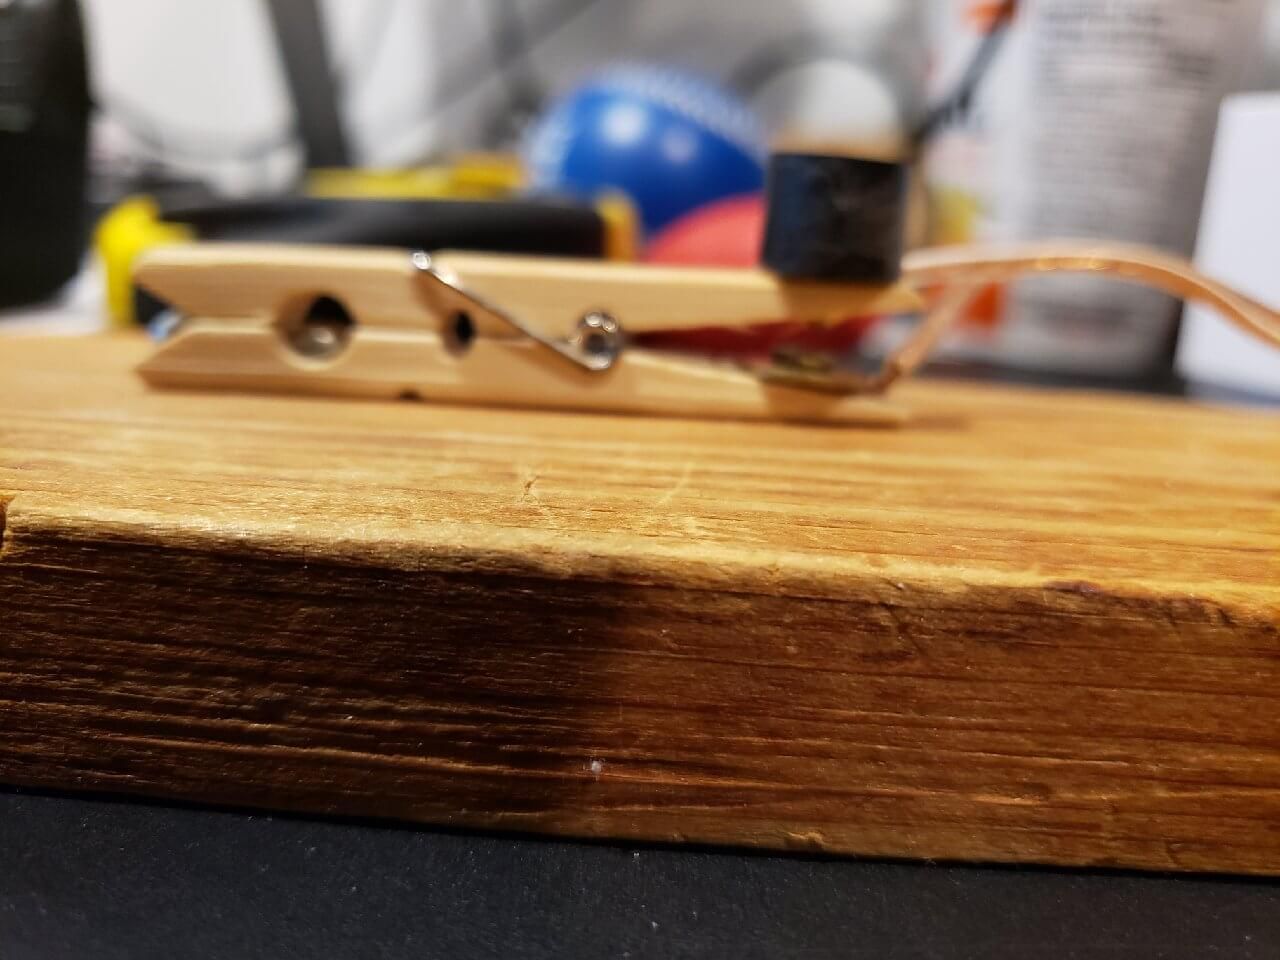
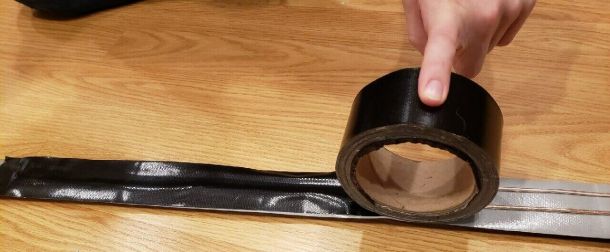
A basic antenna is as basic as a piece of wire or two. And maybe some duct tape.
You can get a kit with all the pieces to make a Morse – oops, sorry again, gotta use the ham jargon – a CW transmitter for under $5, including shipping. They’ve been demonstrated transmitting between 100 and 500 kilometers.
At the other extreme, people will spend thousands of dollars on high-end, high-power radios packed with features, antenna towers, mobile gear for their cars, portable units… and a constant cycle of upgrades.
In between, there is used gear – from all those people constantly upgrading – and economical or do-it-yourself gear.
For the do-it-yourselfer, there’s never been a better time. Test equipment that used to cost thousands if not tens of thousands of dollars might be available for a hundred dollars. Simple devices connected to a PC provide incredible capabilities.
The bottom line: Go back to 3.1 above and figure out your goals. They can probably be met on even the smallest budget.
3.4 Basic Equipment: So what do I buy?
We’re putting together some budget-minded categories for the beginners. Be forewarned that we have some biases:
- A cheaper radio with a great antenna and some accessories may be better for you than an expensive radio with its default antenna
- Variety, learning and experimenting is important
3.4.1 A good paper notebook
You want to log contacts – callsigns, dates, times, etc. It may seem trivial at first, but if you are on VHF/UHF, but you will find yourself trying to recall some info that was shared, the call sign of the person who shared it, frequencies at other info.
Some people like to record contacts at the front and make technical or other notes starting at the back. Whatever works for you.
3.4.2 Basic kit
Unless you are remote from everyone else of simply have a dream of around-the-world-communication-and-nothing-else-will-do, you want to start with some sort of VHF/UHF radio. This is where most of the chatter will happen with local operators and especially club members.
As long as you can reach some repeaters, a handheld radio (HT or handheld transceiver in ham-speak) is enough to get you started. They can be as cheap as $40 – and even less if you can get together with other club members or people in a class and buy them in lots of 10.
On the other hand, HF long-distance transmission may be your dream, and nothing else will do.
To get you started, we’ve come up with some suggestions for a first VHF/UHF setup.
We are working on the same for HF.
Step 4 Getting ready to get on the air
You’ve begged, borrowed or bought some gear, and now you want to use it. But your ham radio training has scared the bejeezes out of you because of all the rules and regulations. The radio in front of you has more buttons than a 747 cockpit. As for the manual that came with your radio… well, for a beginner, your typical radio manual might as well be encrypted for all the good it will do you.
We’ll take you through the basics.
4.1 On-Air Language, Behaviour and Ethics
The International Amateur Radio Union (IARU) has put together a great document on on-air behaviour and language called the IARU Ethics and Operating Procedures for the Radio Amateur. It’s a pretty good read, and handy as a reference. It’s available in 25 different languages.
Don’t forget that in Canada, you can speak any language on the radio – but you must announce your call sign in English or French at the start and end of any contact and at least every 30 minutes during the contact.
4.2 Basic Radio Controls
The average radio manual is at best an enumeration of features. In the worst cases, it was cut-and-pasted from other work by someone who lied on the job application about knowing the language, or even for a completely different radio.
The following control categories are essential to the use of any radio. Figure out how to use them before getting on air with your radio.
4.2.1 Volume, AF Gain, Squelch and Monitor
On a small handheld radio, there’s a big obvious knob on the top that you twist to turn the thing on, and twist some more to increase the volume. If only things could be kept so simple.
Volume control
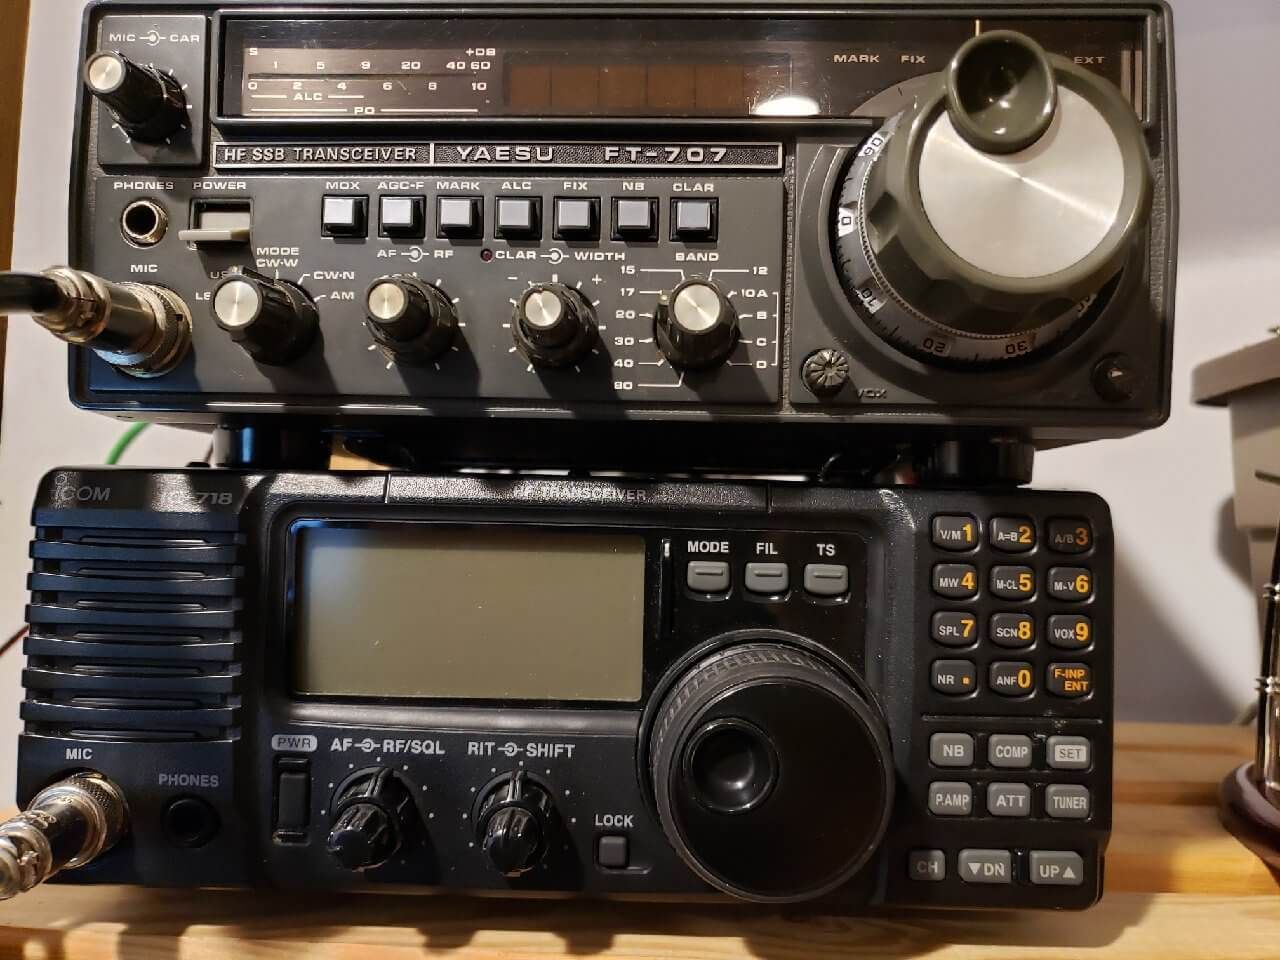
Look at the two rigs in the picture above – at the top a circa-1980 Yaesu FT-707, a wonderful radio with manual controls, and at the bottom, a circa-2000 ICOM 718, with fewer knobs and button and a numeric keypad that has become ubiquitous on the larger HF radios.
We dare you to find a volume knob on either one.
If we harken back to the days of radio yester-year, during the dark ages when the Industry Canada question bank was developed for ham tests, we would be familiar with the concepts of Audio Frequency Amplifier – which amplifies audio so we can hear it… what a volume knob does for you. Look again and you will see a knob labeled AF. Winner winner chicken dinner.
The more astute among you who studied for the test will say “Hey! Wordy ylab dudes! The test questions talked about audio amplifiers on the input from the microphone to the radio, and on the output, from the radio receiving the signal to the speaker. Which is it?” Good catch, astute reader!
Most modern radios have automatic gain control (AGC) on the microphone input, so they don’t need a manual control. There may be some level of control available from an obscure function from the numeric keypad, but few ever use it. Just move the mic closer or farther from your mouth. Speak up or stop yelling.
Now look carefully at the top radio… on the upper left corner… you see a little knob labeled mic. Yup, that’s the input audio amplifier. From the days before AGC.
Squelch control
If you tune any AM radio to a frequency where there is no station, you get a hiss noise. Get to a station, and you hear … well, it’s AM, so it’s either religion, news, a language you don’t understand, or a politically-biased rant. Or all of the above. Please avoid the urge to go back to that soothing hiss. You don’t hear the hiss on a local station because it’s always transmitting.
On amateur radio frequencies, transmission is a stop-start thing. If no one is transmitting, you hear the hiss. When someone transmits, it stops.
The squelch control – SQL for short (sorry, computer geeks, there’s no database hidden in your radio) – allows you to block out that hiss. You turn the knob higher until the hiss stops. When someone starts transmitting, the signal level is higher than the background hiss you blocked and it comes in above the squelch level, loud and clear. When no one is transmitting, blissful silence.
Related to squelch for noise reduction is the RF knob – radio frequency amplifier – that controls gain on the radio signals being received. The effect can be like squelch because turning it down eliminates noise from weaker signals. On our two radios in the picture, the ICOM combines squelch and RF on the same knob, and don’t ask us how that works. The description in the manual is incomprehensible. On the Yaesu, there’s no squelch, just RF.
Any modern self-respecting radio has the squelch and volume/AF controls on concentric knobs like on the ICOM. The two are used together all the time. When your radio is silent, you wonder “Is there no one transmitting?”. Or “Did I turn down the radio when that call came in?” Gradually turn down the squelch until you hear the hiss again… and if you hear nothing, turn that volume back up.
Monitor button : turn squelch off… and maybe more
On a lot of cheaper radios like handhelds, you won’t find a squelch knob. The squelch level control is available by working your way through menus on the digital keypad. Yuck. As a simple but useful compromise, many will have a monitor button to momentarily turn squelch off. It’s usually right under the transmit button on the side of the radio. Hold it down and you hear the background hiss. Again, great for adjusting the volume level when there is no transmission.
On some other radios like the ICOM in the picture below, when operating in duplex mode for repeaters, the monitor button will also switch to the duplex transmit channel so you can directly listen to what someone else is transmitting to the repeater instead of the output of the repeater. We’ll have more detail on that in the advanced repeater section.
Yet another layout
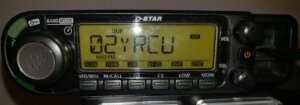
Here’s a pretty new ICOM ID880H. Now they’ve gone to separate volume and squelch knobs on the right. But they make up for it with a wildly complicated knob on the left.
VOX- Voice-activated transmission
We all love to press that transmit button on the microphone when we start talking. But it’s not necessary.
VOX (Voice-operated exchange) can be set to automatically transmit when you start speaking and stop transmitting after a suitable pause. Your cell phone does this automatically, and so well that you don’t even notice.
Your radio will have two controls for VOX:
- On/Off
- VOX level – a minimum sound level before it kicks in to compensate for background noise.
There are advantages and disadvantages to VOX. Wikipedia has a great overview of the issues.
While Canadian jurisdictions still allow licensed ham operators to use their radios while driving, it’s still best to be hands-free and not attract unnecessary attention from police who may still pull you over. Even better: avoid radio altogether when driving.
4.2.2 Tuning/VFO, bands and presets
Radios have two modes for selecting your station:
- Presets, where you pre-program the frequencies you use, along with, as appropriate, a more and more freakish set of parameters
- VFO – ham-speak for tuning – where you set the frequency by punching it in on a keypad or turning a knob or… it can get really complicated. VFO, by the way, is Variable Frequency Oscillator. Because on older radios you had one of those to tune to the station. Now it’s all computer chip magic.
Let’s hear it for the band
If you did your license study or maybe checked out our post or video on the subject, you know there are different radio frequency bands where amateurs are allowed to transmit.
Big gotcha: Different countries have different rules and bands for amateurs. Your radio is designed with a lot of flexibility, and may have bands and frequency ranges within bands where you are not allowed to transmit based on your license or country rules. But you are allowed to listen. We’ll cover more of this in section 5.
On a handheld and many other rigs, you can punch in your frequency, and it automatically does whatever it has to do to set the right band. If you punch in a frequecy outside of a range the radio can’t accept, it just ignores you and goes back where it was.
On many older radios, you need to select the band first, and then tune with a knob within that band. Our old Yaesu in the earlier picture makes this really clear, with a knob for bands from 10 meters to 80 meters.
Mobile and smaller radios have limited faceplate space, so they won’t have a numeric keypad. Some get around this by loading the mic with control buttons, like the ICOM ID880H.
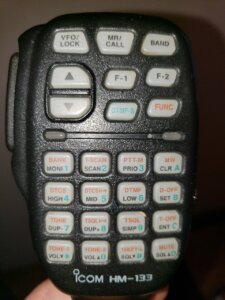
This mic needs its own manual.
VFO Tuning steps
Whether using up/down arrows on a keypad or turning a VFO/tuning knob, you will notice the frequency going up and down in steps. 10, 12.5 or 25 KHz are common increments.
This is usually set in the menus with a parameter called Steps. Find the setting and adjust it to your preference.
On some radios, tuning precision is limited by the internal circuitry. For example, entering frequency 166.457 on some radios will result in slightly different value on the display – 166.456 for example. The radio will pick the closest value based on the precision of the tuning circuitry.
4.2.3 Transmit power level
The golden rule of radio applies: always use as little power as possible.
Most radios have a fixed set of power levels. For example:
- Low 1 watt and high 5 watts for a handheld
- Low 5 watts, medium 10 watts and high 50 watts for a mobile UHF/VHF or portable HF radio
- HF rigs will go to 100 watts and higher
Power levels higher than 5 watts should only be used if you are at a safe distance from the antenna.
Learn how to set the power and how it is displayed on your radio’s display. You should know what it is at all times. When you get on air, ask for a test and drop to a lower power level to see if it works.
Power level indications on the display can be tiny and cryptic. Try the different levels and make sure you can identify them. On some radios, it’s just a static indicator. On others your radio, you may get a an indicator when you hit the transmit button – often the same indicator as your receive signal strength.
Transmit power level can change on you!
Our next section deals with channel presets – and on many radios, a power level can be assigned to the preset. So changing frequency with a preset can change your power level!
4.2.4 Presets, duplex and CTCSS tones – and programming software
You can enter your favourite frequencies into presets on most radios. This is phenomenally useful when using repeaters, which use duplex communication with:
- A transmit frequency
- A receive frequency
- A silent (to humans) CTCSS tone to trigger the repeater operation.
Our repeater basics page tells you more about that.
With digital radio systems, you may have far more parameters, making setting up presets even more critical. You can also assign names to the channels that are easier to remember than frequencies.
In the radio world, they call this programming the radio. No, you’re not writing software – you are just configuring it.
To make it even easier, newer radios have computer interfaces and software to set up the presets, and sometimes other parameters of the radio. The settings can all be saved to a file. Radio club members with the same radio might share a large list of repeaters. If you work from the same file, you can simply agree to change to “channel 12”, and everyone has the same settings.
But… file formats can be different between manufacturers, and even between radios for the same manufacturer.
You will require a programming cable. While manufacturers are gradually moving to standard variants of the USB interface, many radios have proprietary cables. Include the cost of the cable in your radio selection criteria.
The Chirp software was developed by radio amateurs to allow you to program multiple radios and keep the same file format. The list of supported manufacturers and radio models is huge. Before buying a radio, it’s a good idea to check if it’s supported by Chirp. It makes life a lot easier if you can move all your settings between radios and friends.
Warning: radios using digital transmission standards like DMR, Fusion and D-Star may have limited compatibility with Chirp because of all the additional parameters associated with digital radio settings.
4.2.5 DTMF Tones
Radios that connect to repeaters – particularly those designed for the VHF and UHF frequency bands – have the capability to send the same tones as touch tone phones – DTMF tones. For radios, you have:
- Digits 0 through 9
- * and # symboles
- Letters A B C D
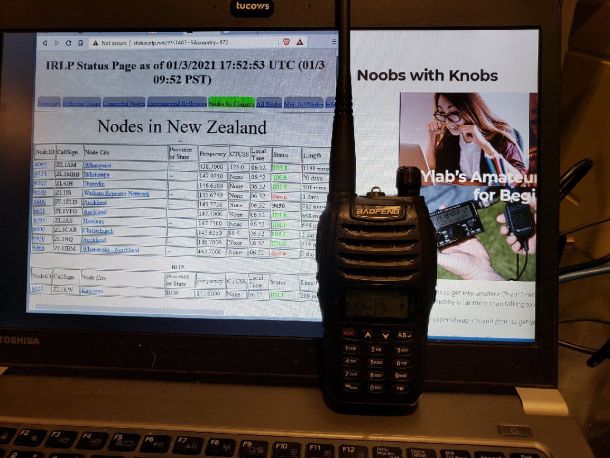
Tones are used for things like controlling repeaters remotely. IRLP is a protocol supported by many repeaters that connects the repeater to the Internet, and through that connection, allows you to connect to other repeaters all over the world. When you do that, the repeaters are linked, and everything that happens on one repeater is heard on the other linked repeater. You enable and disable the link by entering DTMF tones. Our IRLP page guides you through the process.
Using the tones can be as simple as pressing the keys corresponding to the digits while holding down the transmit key… or a lot more complicated. Check your radio manual to find out how DTMF tones are generated… and, in particular, how to generate the ABCD tones. The keys are not usually labeled for those.
4.3 Band Plans
For whatever radio band you will be using, you need to get familiar with the band plan.
Band plans contain two key groups of information
- The maximum and minimum frequency allocated. This is critical, because the frequency range may be smaller than the range your radio allows. This is the one part of the band plan that is a legal requirement set by the government.
- Recommended usage sub-frequencies within the band. Every amateur is allowed to use the band. But there are different uses – repeaters, morse/CW, satellite communications (yes, really). This is where things get organised.
The recommended usage, while officially an advisory thing, is not to be taken lightly. Here are two examples:
- A radio club has gone through the expense and effort of putting up a repeater for everyone’s use. You should not be interfering with it.
- There are amateur radio satellites transmitting at specific frequencies. They can’t be changed. You should not be messing with this.
In Canada, the band plans are developed, maintained and published by the Radio Amateurs of Canada (RAC).Click here to read about everything they do. The band plans are developed in consultations with all levels of government and with international organisations to ensure amateur radio operators can communicate with each other on shared frequecies.
This is the main page listing all the amateur bands in Canada.
Let’s take a quick look at a couple of snippets from the 432 MHz / 70 cm band, more commonly known as the UHF band, and available to all Canadian amateur radio license levels. It’s one of the two bands that’s on all HT (handheld transceiver) and mobile radios.
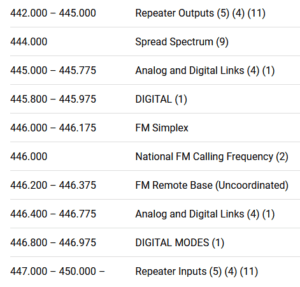
Let’s take apart some of the info.
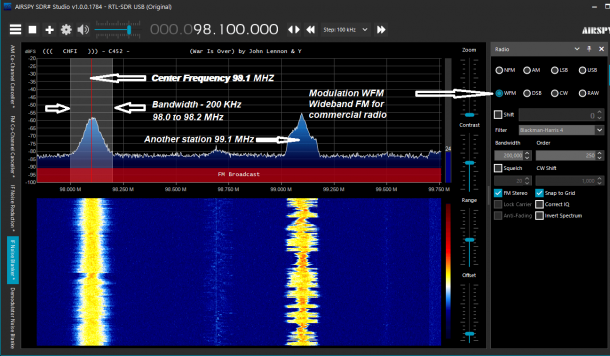
446.000 National FM Calling Frequency
- A Calling Frequency is where you look for other people to communicate with in simplex mode. It’s often referred to as the QSO frequency where you Seek Out other people to communicate with. Star Trek fans would call this the “hailing frequency”. Notice that it’s a single frequency and not a range. This is where people will call out their call sign and “CQ CQ” looking for contacts.
- It’s FM, which tells us that it’s FM modulation for voice. Because there may be other calling frequencies in the band for other purposes.
- National tells us that this is generally agreed to for all of Canada. Other bands that are used for longer range communication may have international or global allocations.
- Best practice is to make the contact, and then agree to move on to another frequency. But where do you go? Look at the bandplan for…
446.000 – 446.175 FM Simplex
- After making a contact on the QSO/Calling Frequency, and you should then move to a frequency in this range
- You can arrange for a contact to reach you or set up a net on a frequency in this range. Or if you are organising a camp or outing with friends where you will be communicating frequently.
- It’s a good idea to have one or two of these frequencies programmed into your radio so you can quickly switch.
442.000 – 445.000 Repeater Outputs
447.000 – 450.000 Repeater Inputs
- Repeater Outputs is the frequency range where the repeater is transmitting – so where you will be listening. It’s really, really rude of you to transmit on this frequency. Expect abuse if you do.
- Repeater Inputs is the frequency range where you transmit to the repeater and the repeater listens and retransmits for you on the Repeater Output.
- A repeater will always have an assigned input and output frequency in these two ranges. From the radio training, you may remember that in the UHF band, the offset between the transmit and receive frequency is 5 MHz. This matches the difference between the Inputs and Outputs frequency ranges.
You can find more info on our repeater page.
Let’s look at another snippet from the same 70 cm band plan.
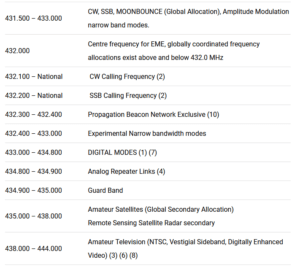
Now we’re into some funky stuff.
- 432.100 and 432.200 – CW and SSB calling frequencies. Despite what you hear from grouchy old ham operators, yes, you can do morse in UHF.
- 435.000-438.000 Amateur Satellites (Global Secondary Allocation). With the right antenna, you can communicate with satellites, even with a small radio. These are lower orbit satellites that constantly rotate around the earth, and not the higher-altitude geostationary satellites that stay over the same spot. So of course it makes sense for the allocation to be Global.
There’s lots more… but you get the idea.
As a beginner, print it out and keep it up on the wall. It’s handy.
For example, if you are using the scan function on your radio to search for contacts, the scan function will go through the full frequency band. If it stops on what sounds like in interesting conversation that you want to join, don’t just start transmitting on the same frequency. The two biggest questions before transmitting:
- Is it on a repeater frequency? Then you should look up the repeater and configure all the settings for that repeater.
- Is it within the frequency band? Never forget that your radio – and its scan – can go outside the limits of the Canadian frequency band allocation.
Now that we’ve gone through all that… Get on the air! (page coming soon).
What to read next


YLab
123 Hillsview Dr, Richmond Hill, ON L4C 1T3