Raspberry Pi Project: Zeroshell Firewall and Captive Portal
Disaster recovery in a briefcase. Part 1.
A ylab member has a requirement for a backup firewall… and more. At her company, they use a top-quality commercial firewall that provides and front-ends a suite of other services like,VPN access into the company and a captive portal to control to several outbound VPNs to customer. They use multiple internet connection with services distributed across them. That makes them very dependent on this firewall’s operations – which brought up some big questions:
- What do they do if the firewall is down for maintenance or service?
- What if they are blocked from their office and need a disaster recovery replacement?
- What would it cost to duplicate the services?
The simple answer would be to replicate everything with the same hardware. But that’s a very costly exercise, and the existing gear takes up a lot of space. Could a simpler solution work?
Here’s how she solved the problem.
Dual Raspberry Pi: Firewall and Captive Portal With Zeroshell
This got me thinking… many modern firewalls have Linux at their core. Raspberry Pi (RPi)has Linux at its core. Current Raspberry Pi’s have as much power as full computers from just a few years ago.
Using RPi, could I build a compact, emergency firewall system that meets our requirements? The list is extensive:
- Manage dual Internet connections:
- One for internal general internet use.
- One for protected gateway use.
- Protected gateway zone – multiple external VPN access:
- VLAN terminations for separate gateways to each VPN
- Gateways require internet access.
- Captive portal controlling gateway access.
- Logging access for traffic from internal network to protected gateway network, including identification of VLAN gateway being accessed.
- General internet usage is not behind Captive Portal (no authentication required).
Web searches pointed me to Zeroshell . You can look at the web page – the feature list is impressive. Multiple Internet connections; VPN capability; Captive Portal for that control required to the external VPNs. Management interface looks good. And great Raspberry Pi support.
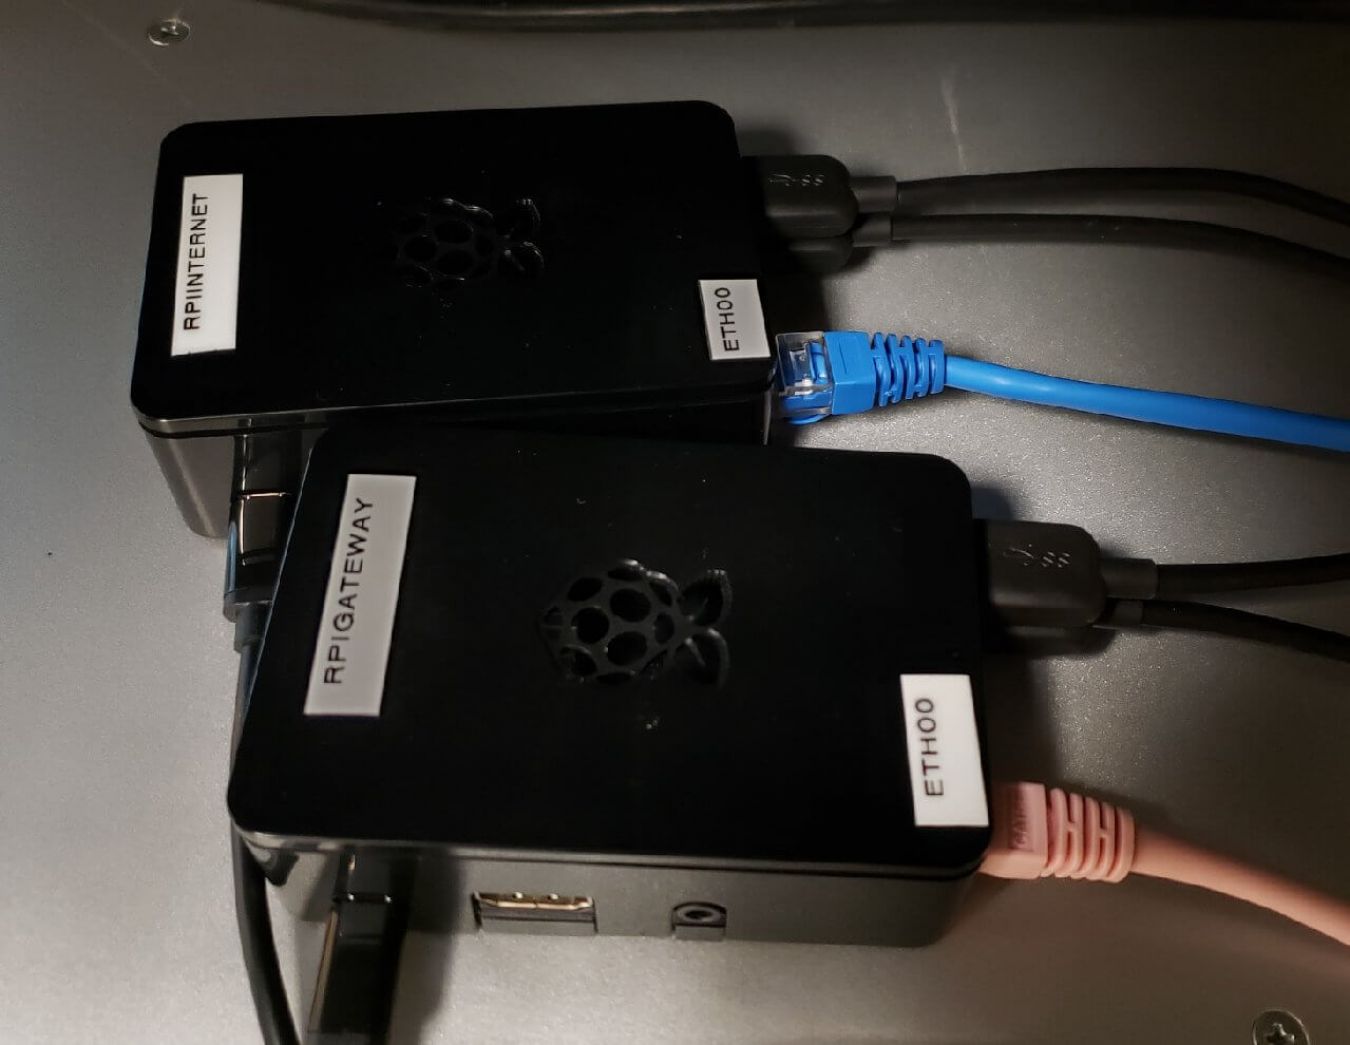
I picked up new hardware to run the test – a Raspberry Pi 3B+ with two additional USB Ethernet adapters. With SD card, power supply, case and other bits, it cost me less than $150 (Canadian). Raspberry Pi 4 was announced the week before, but still not locally available.
Loading Zeroshell was simple. The provider of the Raspberry Pi kit recommended Balena Etcher software for loading system IMG files. It worked without problem for the Zeroshell image.
The Zeroshell management interface proved comprehensive and easy to use. I have more detail on the configuration sequence at the end of this post.
One big glitch: the Captive Portal configuration is all or nothing. That means a portal login would be required both for the access to the restricted outbound VPN gateways, and for general Internet access. That’s more than just a nuisance. It could be a problem for some of our automated systems.
I could spend a bunch of time trying to work around this… or just spend another $150 for a second RPi with all the bits to run the Zeroshell Captive Portal separately behind the firewall.
Would performance be adequate? Our Internet connections for this project are a couple of DSL lines. We ran throughput tests and found the Rpis with Zeroshell could sustain better than 88 Mbits/sec through firewall.
It worked. It passed all our tests. And it’s so compact, we could fit it in a briefcase with plenty of room to spare.
We’re looking at Phase 2 – what critical infrastructure and storage could we add to a briefcase for a completely portable disaster recovery solution?
Stay tuned!
Detailed configuration and setup
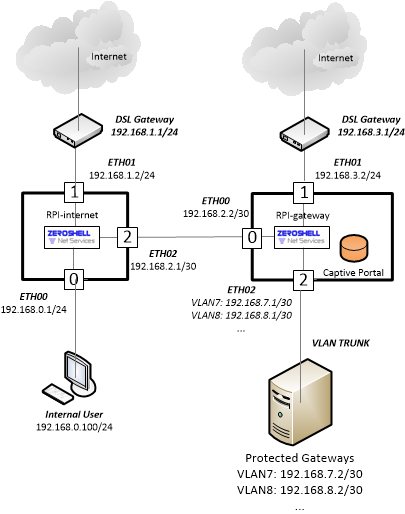
Basic Zeroshell configuration for the following network topology:
For each
Raspberry Pi:
- Flash Zeroshell onto SD card using Canakit balena Etcher software.
- Boot and create a new Profile. This will also allow you to specify the Management interface (ETH00)
- Configure IP addresses on Zeroshell as indicated in the network topology above.
For performance reasons, the Zeroshell RPi image is “headless” – i.e. no web browser. When you load it, all you are working with limited text-based interface. The management interface is provided through an Apache web server included in the Zeroshell installation. You access the graphical management interface from a web browser on another system.
After the network configuration and topology are set on the Zeroshell text interface, hook up a PC to the network for GUI access. You need to pre-configure the PC with an IP address on the same subnet as the Zeroshell management interface.
IP addresses changed in this post to protect whatever needs to be protected. Use your own.
First configure the RPI internet connection:
1. Configure the PC with the selected IP (192.168.0.100/24) and set its default Gateway to the address of the Rpi (192.168.0.1/24).
2. Connect to the web interface of RPI-internet: https://192.168.0.1
3. Accept the certificate errors and add an exception to the browser. NOTE: Fixing this certificate issue is outside the scope of this blogpost.
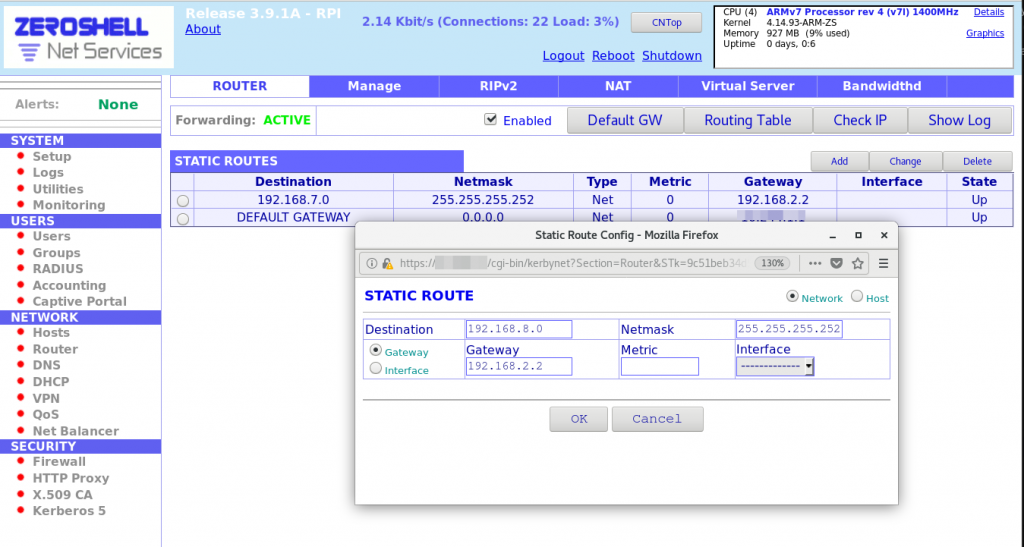
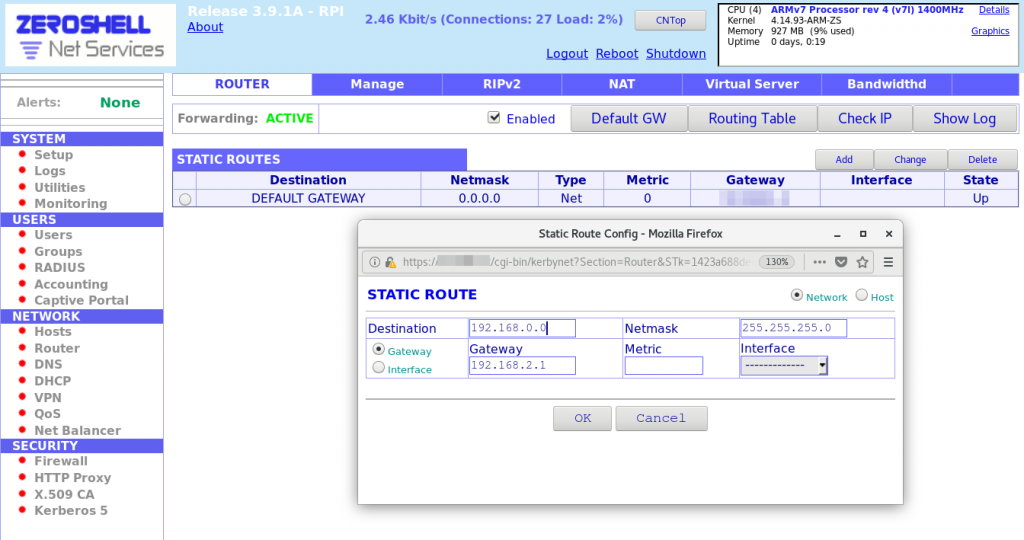
Management GUI of RPI-internet: Static Route Configuration
- Add static routing rule for protected VLAN access:
- Go to the Network > Router page.
- Click on Add to add a Static route.
- In the Static Route pop-up, add route for Destination network 192.168.7.0/30 using Gateway 192.168.2.2
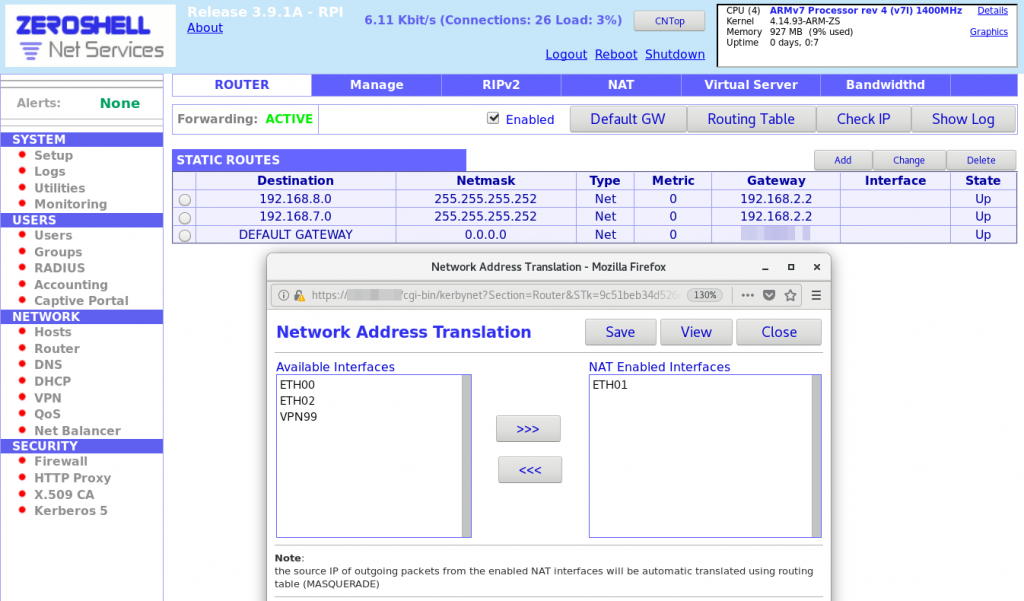
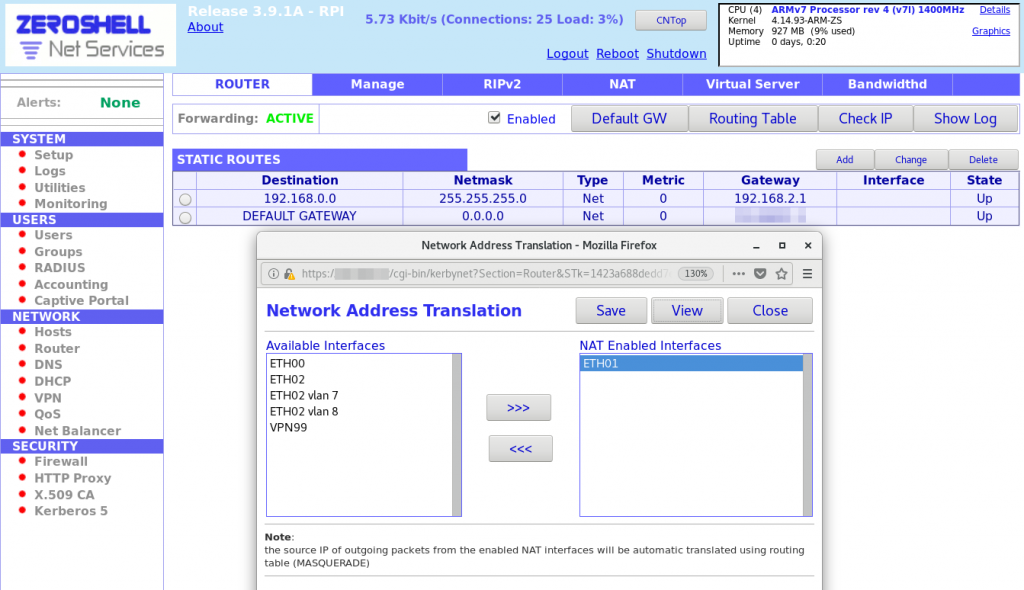
2. Configure NAT for internet access:
2a. Go to Network > Router.
2b. Click on NAT on main blue menu at top.
2c. In Network Address Translation pop-up, add ETH01 to the NAT Enabled Interfaces list.
2d. Save NAT rules.
3. Configure Firewall WAN, LAN, and protected gateway access:
3a. Go to Security > Firewall.
3b. Ensure you’re on the FORWARD page.
3c. Change default policy from ACCEPT to DROP.
3d. Add Firewall rules as shown below.
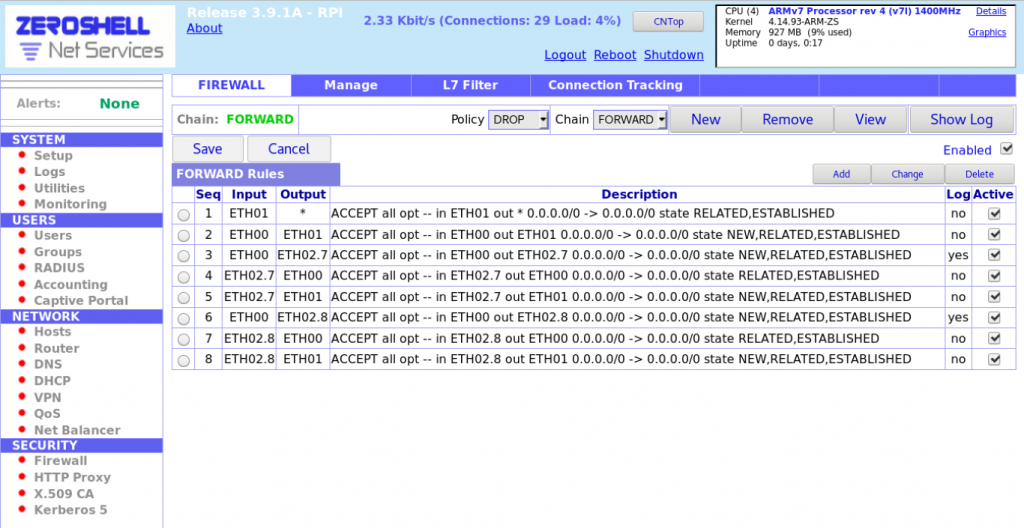
3e. Save firewall rules.
4. Test the Internet connection:
4a. Go to the Network > Router page.
4b. In the top corner, select Check IP.
4c. In the pop-up dialog, enter IP to check: 8.8.8.8 (Google’s DNS).
4d. Click Check and verify RPI-internet is able to connect.
5. Check Internet access from the PC.
To test the Captive Portal to the protected customer VPN network, I set up a Linux server running a web server… and more. I configured the server with KVM virtualisation and multiple VLANs managed by KVM. A web server VM was created with an attached interface associated with VLAN7. The KVM server will terminate the VLAN (set-up for KVM outside scope of this blog post). Assign the web server IP: 192.168.7.2/30.
From the Management GUI of the RPI:
1. Configure static route for internal network access (192.168.0.0/24).
2. Configure NAT.
3. Configure firewall rules using the same process as above, but with the following rules.

NOTE: There is
logging here for access from ETH00 to each VLAN interface.
4.
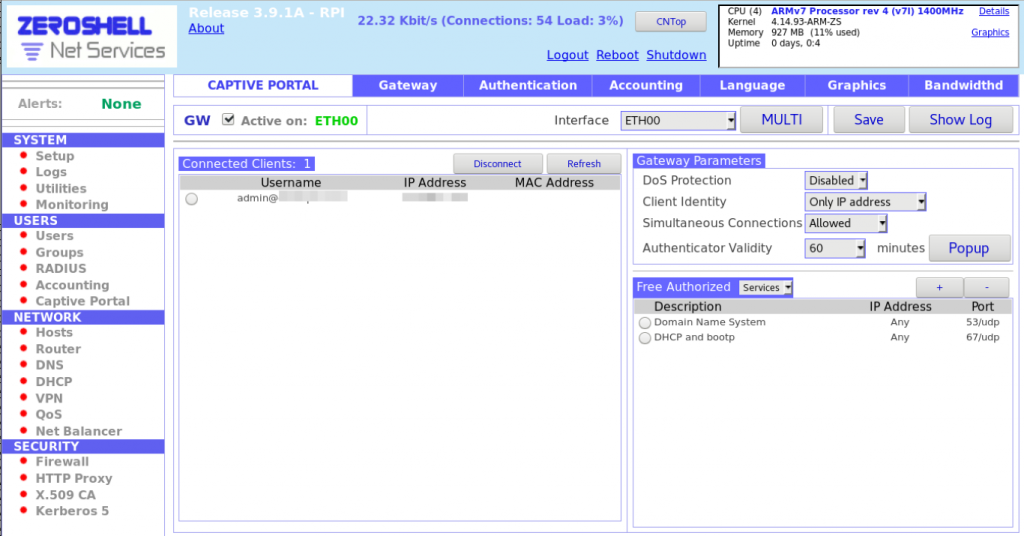
Configure Captive Portal:
4a. Go to Users >
Captive Portal.
4b. Select an interface: ETH00.
4c. Click on Save.
4d. Check Active on:
ETH00.
4e. Under Gateway Parameters, select
Client Identify = Only IP Address.
4f. Under Authenticator Validity, select 60 from drop down.
4g. Click Save again.
5. Configure Users:
5a. Go to Users > Users.
5b. Click on Add in main blue menu at top.
5c. Fill in details such as username and password. First and Last name required.
5d. Click on Submit.
6. Test VLAN access by pinging the web server at 192.168.7.2. It follows the same process as above for testing the Internet connection except the IP is the web server IP.
On the LAN PC, browse to http://192.168.7.2:
1. Verify Captive Portal page shows up.
2. Enter user credentials.
3. Verify the web server page appears.
On the 192.168.7.2 web server, verify connectivity to the Internet by pinging 8.8.8.8.


YLab
123 Hillsview Dr, Richmond Hill, ON L4C 1T3